

4a. Import an existing RainMaker deployment
If ESP RainMaker is already running in this AWS account (deployed by hand, by an older ESP CloudHub, or by a colleague), ESP CloudHub imports it instead of deploying fresh. Importing records which of your CloudFormation stacks is which component, so the dashboard, upgrades and post-deployment checks all work against your real deployment.
You don't start the import or answer questions about it. ESP CloudHub:
- looks for your deployment automatically once the account's mandatory checks pass;
- reads the version your stacks are running from their CloudFormation templates — for ESP RainMaker and for the Voice Assistant — so you never have to know or pick it;
- finds your stacks under the standard names, the names from our deployment guides
(for example
ESP-Rainmaker-Base,ESP-Nested-AddOns, or the Voice Assistant StackSet stacksStackSet-ESP-3P-Integrations-Skills-Add-Ons-…), or custom names it can recognise from the template; - labels the stacks it recognises and stops you from picking a stack for the wrong component.
You only confirm, and answer for anything it can't work out.
The scan only reads your stacks and their templates. Nothing is created, updated or deleted in CloudFormation while you import.
Where it happens
| Where | When | |
|---|---|---|
| A | Account setup, Step 6 | Automatically, right after the mandatory checks pass. |
| B | Configuration page → Import Existing Stacks | Any time later — for example if you continued with a fresh deployment and then realised there were existing stacks. |
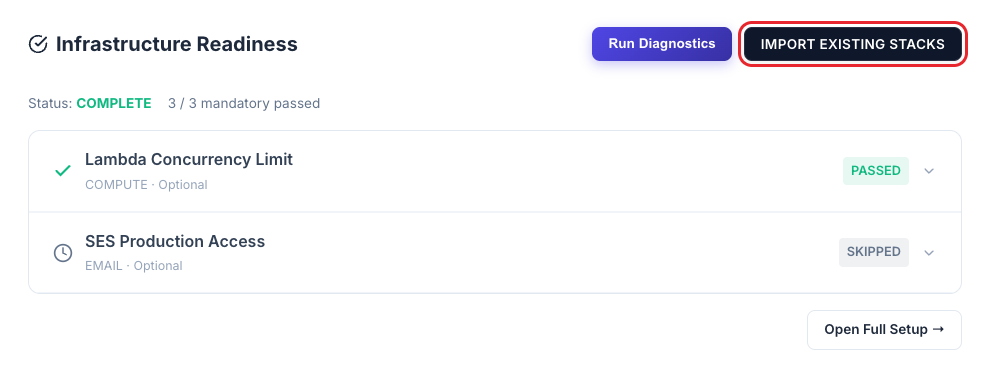
For B: in the ESP RainMaker Classic installer, click the Configuration icon in the top bar (on small screens, open the menu and choose Configuration), then click Import Existing Stacks in the Infrastructure Readiness panel. It scans straight away.
Before you start: the account needs access to ESP RainMaker releases (see Get access to ESP RainMaker releases), and only ESP RainMaker 3.6.0 or later can be imported.
1. The scan
ESP CloudHub looks for ESP RainMaker stacks in the account's deployment region (and the Voice Assistant regions) and reads their templates. This takes a few seconds.
What you see next depends on what it found:
| Result | What you see | What you do |
|---|---|---|
| Deployment found (most imports) | The stacks found and the version they run | Review and confirm — see 2. Review what was found |
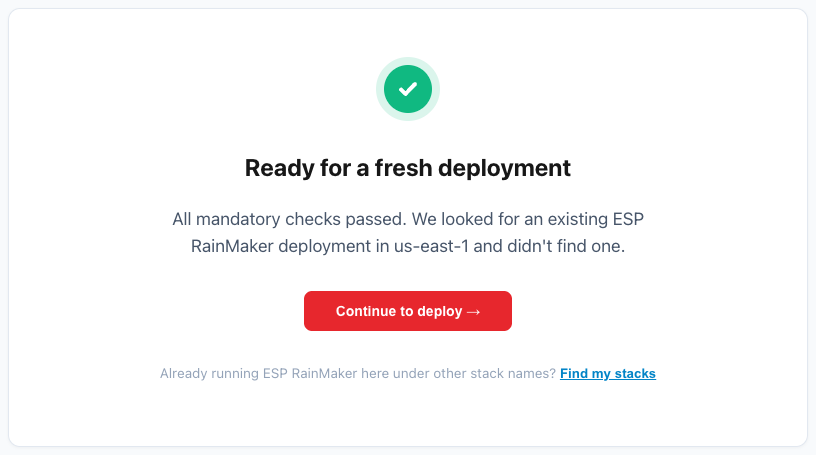
| Nothing found | Ready for a fresh deployment | Click Continue to deploy, or Find my stacks if you know RainMaker is there |
| Version can't be read | Which version of ESP RainMaker did you deploy? | Pick your version — see If the version can't be read |
| Version too old | This deployment can't be imported yet | Upgrade it first — see If your version is too old |
2. Review what was found
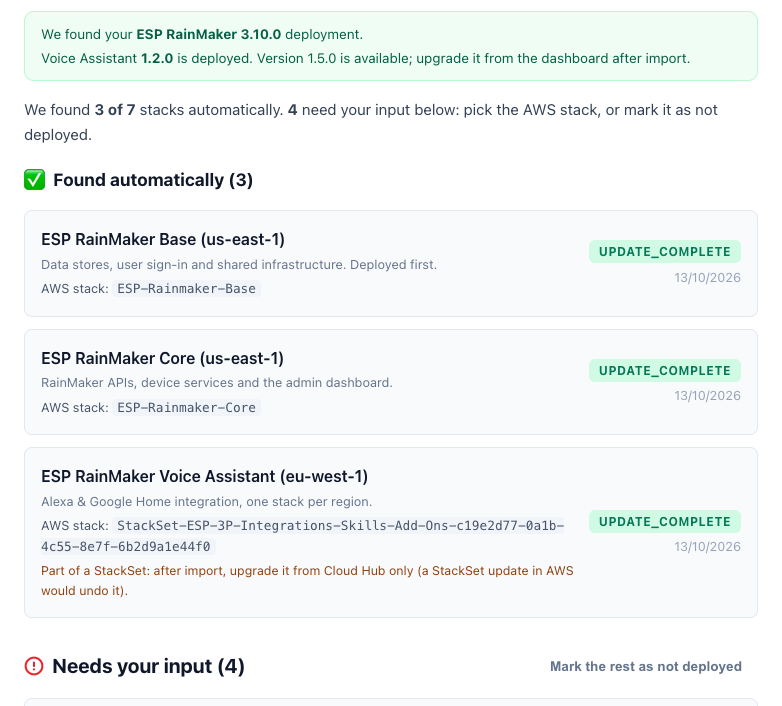
The review starts with what ESP CloudHub found — for example "We found your ESP RainMaker 3.10.0 deployment", the Voice Assistant version, and "We found 3 of 7 stacks automatically. 4 need your input."
Found automatically
These need nothing from you; just check the AWS stack names look right. Each row shows the component, a one-line description of what it is, and the AWS stack it was matched to.
Needs your input
For each remaining row, either pick the AWS stack that runs it, or click Never deployed here. Stacks ESP CloudHub recognises are labelled in the list ("Looks like: ESP RainMaker Voice Assistant · v1.2.0"), and the ones that fit the row are listed first. Stacks already found for another component are not offered.
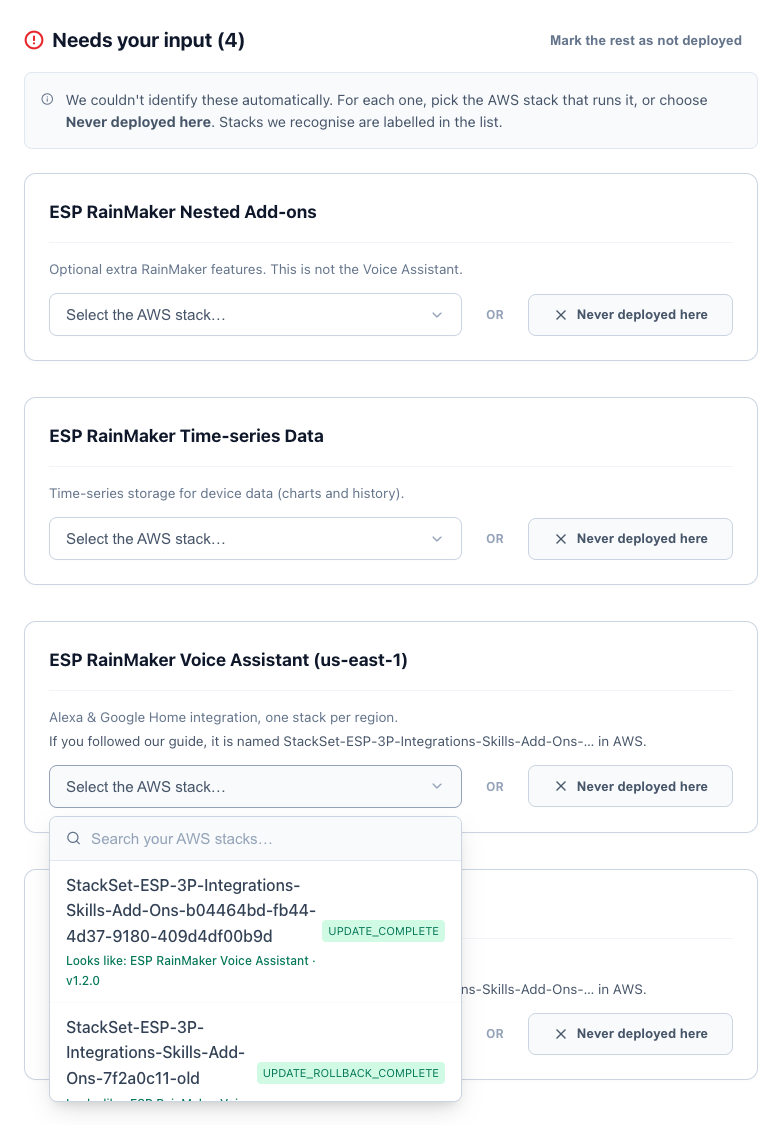
If you never deployed the remaining components, click Mark the rest as not deployed next to the heading. It answers every row you haven't answered yet; rows where you picked a stack are kept.
| Component (row) | What to pick |
|---|---|
| ESP RainMaker Base, ESP RainMaker Core | Your Base and Core stacks. Almost always found automatically. |
| ESP RainMaker Nested Add-ons | Your add-ons stack (often ESP-Nested-AddOns), if you deployed one. Otherwise Never deployed here. This is not the Voice Assistant, even though the Voice Assistant StackSet name contains "Add-Ons". |
| ESP RainMaker Time-series Data | Your time-series stack (often ESP-Rainmaker-TimeSeries), if you deployed one. Otherwise Never deployed here. Do not pick esp-rainmaker-base-timeseries — that is a different stack. |
| ESP RainMaker Voice Assistant (us-east-1), (eu-west-1), (us-west-2) | One row per region. If you integrated Alexa / Google Home, pick that region's Voice Assistant stack (usually StackSet-ESP-3P-Integrations-Skills-Add-Ons-…). If you never integrated voice assistants, click Never deployed here on each row. |
These are not your deployment region. Amazon Alexa calls a skill's backend only in fixed AWS regions, one per Alexa region: us-east-1 for North America, eu-west-1 for Europe and India, and us-west-2 for the Far East (Japan, Australia). So the Voice Assistant is deployed to all three, whichever region you picked when you added your AWS account, and the import shows one row per region.
If you pick a stack for the wrong component
ESP CloudHub warns you straight away and keeps Confirm disabled until you change it:
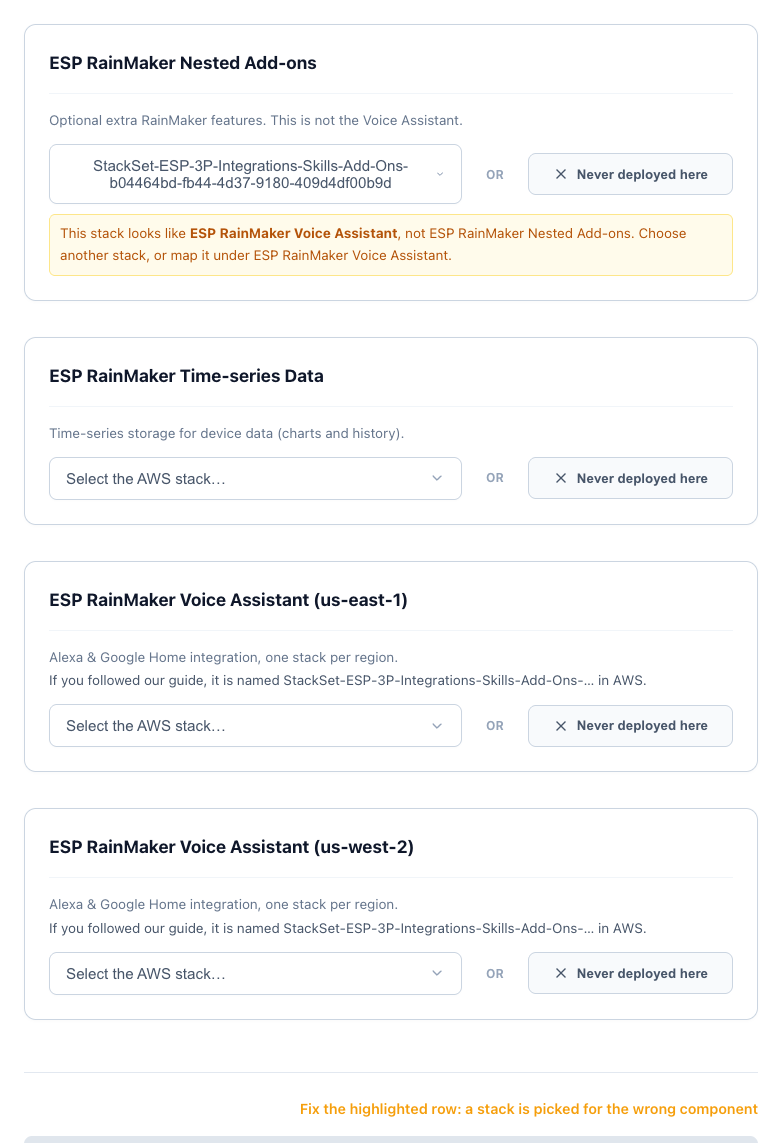
If ESP CloudHub can read the stack's template, it also refuses such an import on confirm, so a wrong mapping can't be saved.
3. Confirm
Once every row is matched or marked as not deployed, confirm:
- In account setup: click Confirm and Import Stacks →. When you see Environment Ready, click Go to Dashboard.
- On the Configuration page: click Confirm & Import, then Finish on the Import Successful screen. To leave without importing, click Cancel (or press Esc) — nothing is recorded.
The result lists each imported stack and the version recorded.
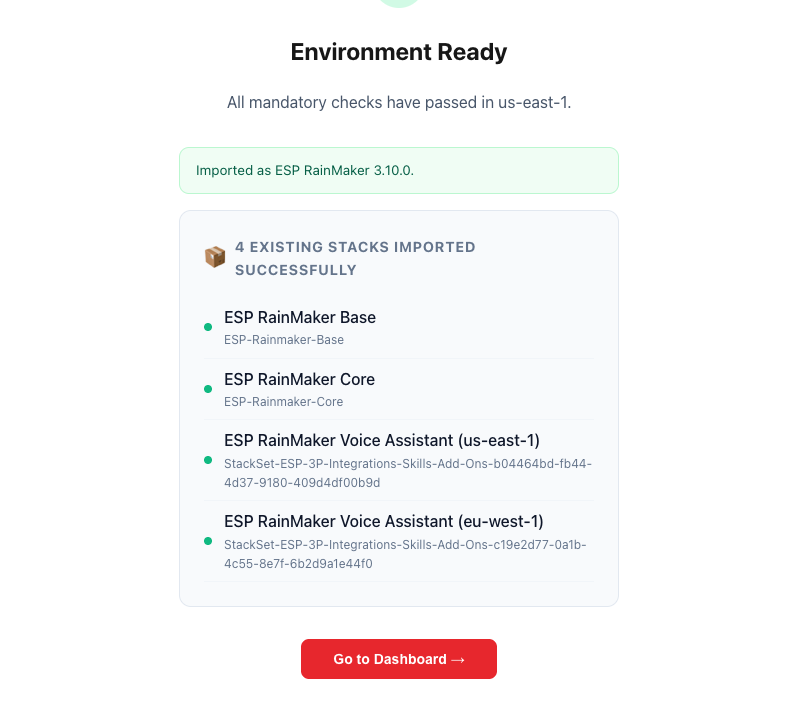
Your existing deployment now appears on the dashboard as the current run, labelled Imported with the time you imported it (hover a stack to see when it was last deployed in AWS).
Common cases
Deployed by following the RainMaker deployment guide
Stacks named ESP-Rainmaker-Base and ESP-Rainmaker-Core (or the Serverless Application
Repository names serverlessrepo-ESP-RainMaker-Base / -Core) are found automatically, and
so are add-ons named ESP-Nested-AddOns and time-series stacks named
ESP-Rainmaker-TimeSeries. Usually you only confirm.
Voice Assistant installed as a StackSet
The Voice Assistant guide installs it with a CloudFormation StackSet named
ESP-3P-Integrations-Skills-Add-Ons, which creates one stack per region named
StackSet-ESP-3P-Integrations-Skills-Add-Ons-<id>. ESP CloudHub finds these and imports
them under ESP RainMaker Voice Assistant for each region, together with the Voice
Assistant version they run.
ESP CloudHub upgrades the regional stacks directly. If you later update the StackSet itself in AWS, it overwrites those upgrades. Keep using ESP CloudHub for upgrades once imported.
If one region has two such stacks (for example an old one left over), ESP CloudHub doesn't guess. Pick the right one yourself — each is labelled with its version.
Your Voice Assistant is older than the latest supported version
Import it as it is. For example, ESP RainMaker 3.10.0 with Voice Assistant 1.2.0, where Voice Assistant 1.5.0 is available for 3.10.0: the import records 1.2.0, and the review already tells you a newer version is available. After import, the dashboard shows Upgrade on the Voice Assistant row — upgrade it from there.
Stacks with your own names
If a stack's name looks like an ESP RainMaker stack (it contains esp, rainmaker, skill,
addon, and so on), ESP CloudHub reads its template and matches it automatically. Otherwise
it appears under Needs your input; pick it from the list.
Nothing was found, but RainMaker is there
This happens when the stacks have custom names and ESP CloudHub can't recognise them. On Ready for a fresh deployment, click Find my stacks (in the Configuration dialog: Find my stacks as well), pick the version you deployed, and choose your stacks from the lists. Don't click Continue to deploy in this case — a second, fresh deployment would run next to your existing one.
If the version can't be read
ESP CloudHub reads the version from your stacks' CloudFormation templates, including
pre-release versions such as 3.11.0-alpha.4. It asks you to pick the version in two cases,
and says which one applies:
-
Your AWS access can't read the templates. Some IAM Identity Center permission sets don't allow
cloudformation:GetTemplate. The stacks are still found by name, but not their version: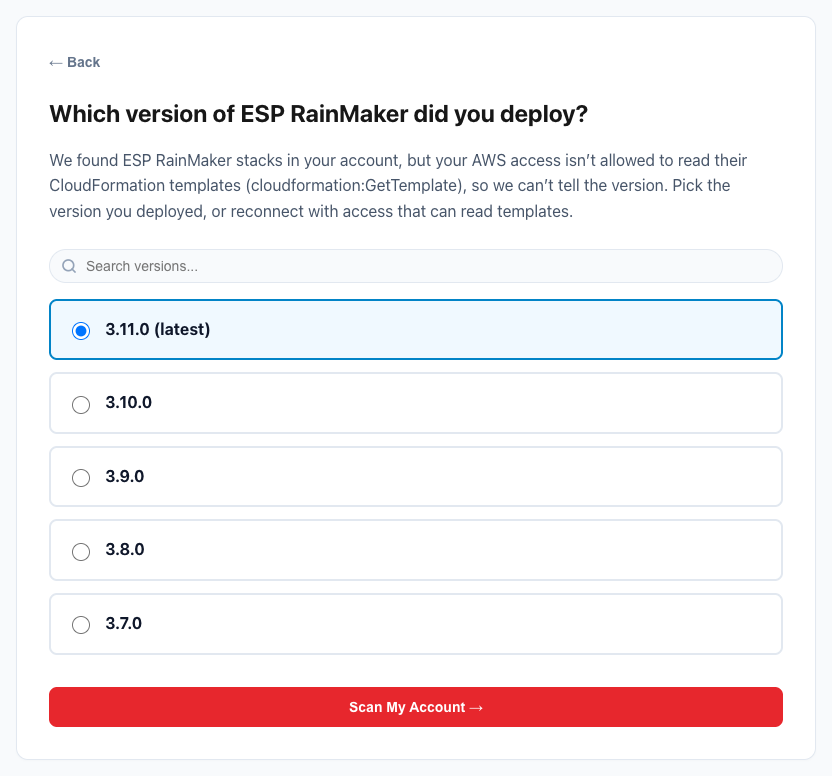
To skip this step next time, connect with a permission set that can read templates (for example
AWSAdministratorAccessorReadOnlyAccess). -
The templates were read, but don't show a version. For example, a customised template. The screen says: "We found ESP RainMaker stacks in your account, but couldn't tell from their templates which version they run."
In both cases, pick the version you deployed and click Scan My Account → (Scan Account → on the Configuration page).
If your version is too old
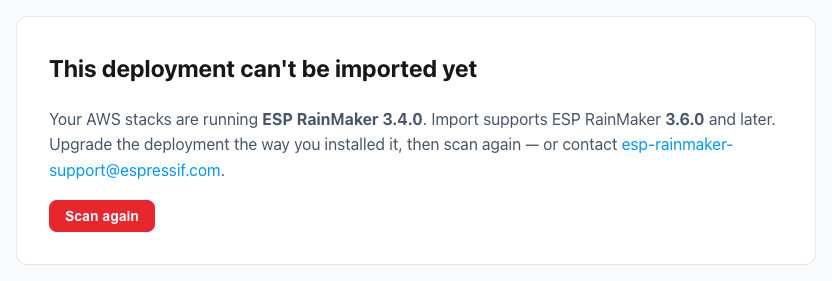
Upgrade the deployment to 3.6.0 or later the way you originally installed it, then click Scan again — or contact esp-rainmaker-support@espressif.com.
You never deployed some components
Click Mark the rest as not deployed once instead of answering every row. Don't mark a component as not deployed if it does exist: it is then left out of ESP CloudHub and upgrades skip it.
You later upgrade a stack in the AWS console
ESP CloudHub notices. When you open the dashboard (or click Sync with Cloud), it reads the version from your stacks' templates. If a stack was upgraded outside ESP CloudHub, it records the new version, the dashboard says "Found changes made directly in AWS", and that version is marked Synced from AWS. The Voice Assistant is covered the same way, in every region.
After importing
- The imported run appears on the dashboard like any other deployment — open any stack to see its configuration and outputs.
- Upgrade the deployment now works against the imported stacks. The no-downgrade rule applies, so the version recorded at import is the floor.
- Run through Post-deployment configuration — an imported deployment needs the same social-login and push-notification setup as a fresh one.
If a mapping turns out to be wrong, return to Configuration → Import Existing Stacks and redo it.