Firmware Images
ESP RainMaker provides a firmware management dashboard, where users can upload firmware project files after binding the device, manage firmware versions and firmware settings, and manage firmware updates.
This section is relevant to OTA firmware upgrades.
Before you can push out an OTA using topics, you need to have the admin access to the node. Please check here to find out how to get the admin access.
Once done, please visit the ESP RainMaker dashboard and follow the further steps.
This would not be relevant for private RainMaker deployments as all who are part of the private deployment have admin access.
Manage device firmware items
Users can view the firmware item information bound to the device node in the firmware management panel, which provides the following paramters.
| Parameters | Description |
|---|---|
| Image Name | Firmware name (customizable) |
| Type | Device type (customizable) |
| Version | Firmware version |
| Model | Firmware type |
| Uploaded Time | Firmware update time |
| Actions | Issue OTA command |
| Firmware Management Panel |
|---|
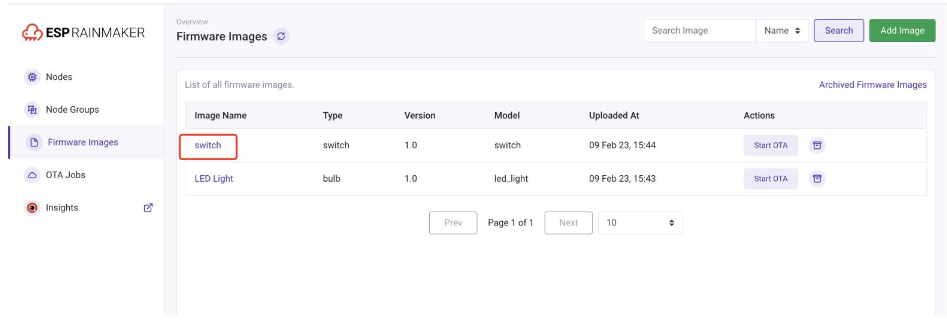 |
| Users can select a firmware and click to view the detailed information of the firmware. |
Where there are many firmware uploaded, you can use the search function to search for the specified firmware.
Currently, the dashboard provides Name, Type, Model searches in three dimensions.
| Firmware details Users |
|---|
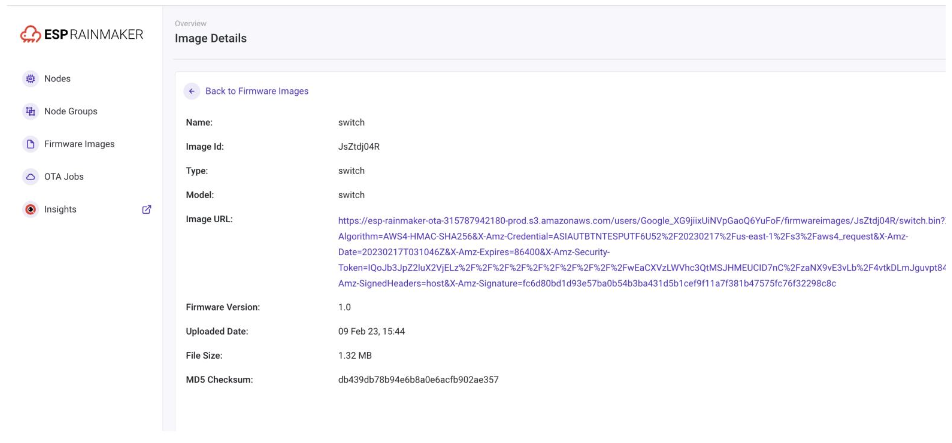 |
| Users can download the firmware online through the image URL on the information page. |
Add new firmware items
You can add firmware when binding a new device or running a new project. The steps are:
Firmware Images > Add Image > Fill in the relevant firmware information > Import the firmware file locally
| Adding new firmware |
|---|
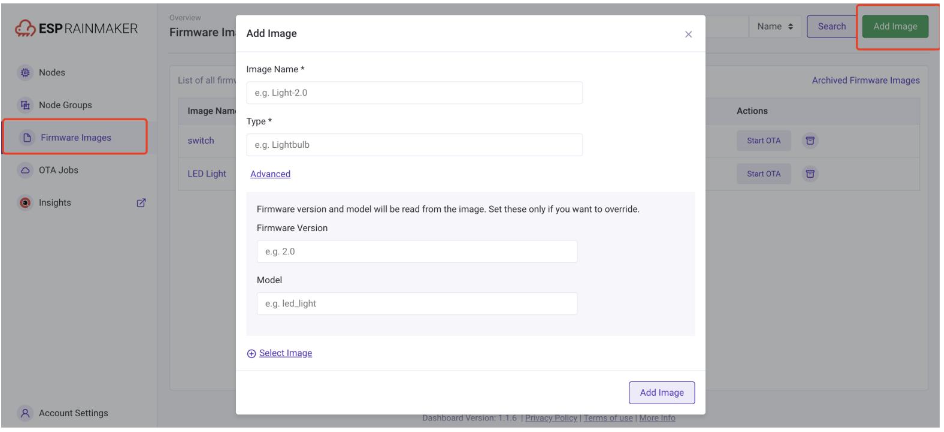 |
| When filling in the firmware information, the user must provide the name and type of the firmware. The system will automatically extract and analyze the firmware version and model, but the user can also manually input them in the Advanced option. |
- Fill in the details in the pop-up window.
- The 'Advanced' opions of Firmware Version and Model (which is the same as the project name) should be left blank as they will be read from the binary directly. They have been provided only for wherein the image is encrypted or is meant for some non-ESP Host MCU.
- Select the upgrade image just compiled and add it.
- The image should now be visible in the
Firmware Imageslist.