User-Node Mapping
In ESP RainMaker, Claiming is performed first when the node initially contacts the RainMaker cloud, followed by user-node mapping.
- Claiming registers the device with the cloud and assigns it a unique node ID, but it does not link the device to any user.
- Before the devices under a node can be monitored and controlled remotely, the node must first be mapped to a user to ensure that only the specific user has access permissions.
- This user-node mapping process can only be performed using the ESP RainMaker phone app or CLI, as they drive the workflow for assigning the node to a user.
ESP RainMaker supports two user-node mapping methods that can be chosen at compilation time:
- Challenge-Response Based Mapping: The newer, more secure method (recommended for production). Enable using
CONFIG_ESP_RMAKER_ENABLE_CHALLENGE_RESPONSEin the menuconfig. - MQTT Based Mapping: Uses shared secrets with node-to-cloud MQTT communication (default).
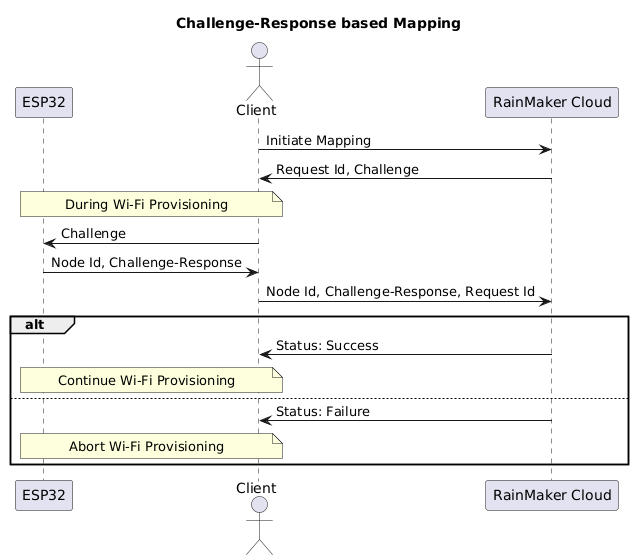
Challenge-Response Based Mapping (Recommended)
This is the recommended method for production firmware as it is more secure and reliable. It requires ESP RainMaker iOS app v3.4.0+ or Android app v3.7.0+.
Key Advantages
- More secure: Uses cryptographic challenge-response instead of shared secrets
- Early mapping: Mapping happens before Wi-Fi credentials are sent, ensuring the node is added to user's account before network connection
- Network independence: Node doesn't need to be connected to the network to be mapped
- Streamlined: No direct node-to-cloud MQTT communication required during mapping
Workflow Steps
- Initiate Mapping: The client initiates the mapping process with the RainMaker cloud over a secure, logged-in session.
- Challenge Generation: The cloud responds with a Request ID and a cryptographic challenge.
- Challenge Relay: The client sends the challenge to the ESP32 node via BLE.
- Response Generation: The ESP32 generates a challenge-response using its credentials and sends it back to the client along with its Node ID.
- Verification: The client forwards the Node ID, challenge-response, and Request ID to the cloud.
- Status Confirmation: The cloud verifies the response and returns the mapping status (Success/Fail).
- The node must be claimed before using this method, as it requires MQTT credentials to be available.
- This is automatically satisfied in private deployments where node credentials are pre-flashed.
MQTT Based Mapping
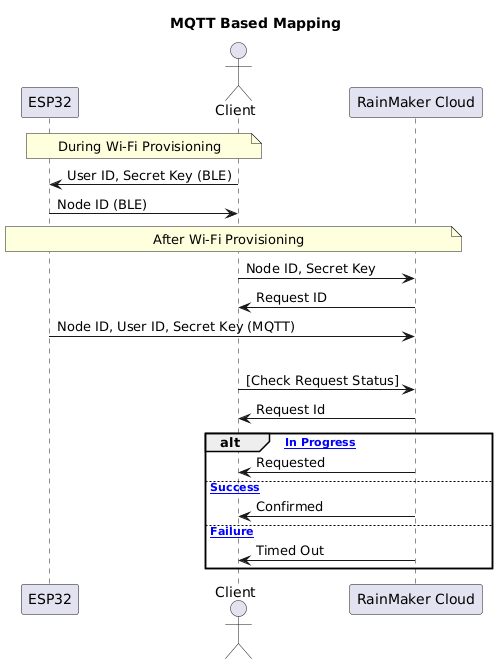
Workflow Steps
-
During Wi-Fi provisioning, the client sends the user ID and a randomly generated secret key to the node using BLE. The node then sends its node ID back to the client.
-
The client sends the node ID and the secret key to the RainMaker cloud over a secure and logged-in session. The RainMaker cloud responds with a request ID to the client.
Why is the user ID not sent from the client to the RainMaker cloud?The user ID is not sent because it is extracted by the Cloud from the session information. Since the request happens in a logged-in session, the cloud already knows who is making the request, reducing extra data transfer and minimizing security risks.
-
The node also sends the node ID, user ID, and secret key to the RainMaker cloud over secure MQTT.
infoStep 2 and Step 3 can occur in reverse order without affecting the workflow.
-
The client queries the RainMaker cloud for the status of the request based on the given request ID. There are three types of responses based on the request status:
Status Description Confirmed If the RainMaker cloud receives matching information from both the client and the node, the mapping is considered successful Timed Out If one minute has passed since the request was made, but no matching information was received from the other end, a timeout is triggered Requested Mapping is still in progress. Keep checking
Comparison: When to Use Each Method
| Feature | Challenge-Response | MQTT Based |
|---|---|---|
| Security | Higher (cryptographic challenge-response) | Standard (shared secrets) |
| Network Dependency | Node doesn't need network connection | Node needs MQTT connection to cloud |
| Mapping Timing | Before Wi-Fi credentials are sent | After Wi-Fi connection established |
| App Requirements | iOS v3.4.0+, Android v3.7.0+ | Any version |
| Production Use | ✅ Recommended | ✅ Supported |
| Private Deployments | ✅ Works with pre-flashed credentials | ✅ Compatible |
| Setup Complexity | Simpler (fewer steps) | More complex (node-cloud communication) |
Use Challenge-Response based mapping for new projects and production deployments. Use MQTT based mapping when you need compatibility with any app version or have specific requirements for MQTT-based communication.
- To learn more about the node-side communication in Step 3 of the workflow, refer to User-Node Mapping.
- To learn more about the client-side communication, click here.