Configurations
Welcome to the post deployment section, the last stage in the deployment of Private RainMaker. 🚀 This section should be reviewed only when deployment of RainMaker Services have been successfully completed.
As there are differences in the deployment of Private RainMaker between China and the global region. Two tabs are displayed to distinct global and China region. Please select the relevant tab based on the region of your deployment.
- Global Region
- China Region
Configure Amazon Cognito to Use SES as its Email Provider Instead of the Default Cognito Sender Address
If end users are still receiving emails from no-reply@verificationemail.com despite configuring a verified SES email address, follow the steps below to resolve this issue.
Here are the steps to correctly configure the SES email provider for your Cognito user pool:
-
Access Amazon Cognito.
- Open Amazon
Cognitoin the AWS console. - Select your user pool (e.g.,
rainmaker-user-email-mobile-pool). - Click
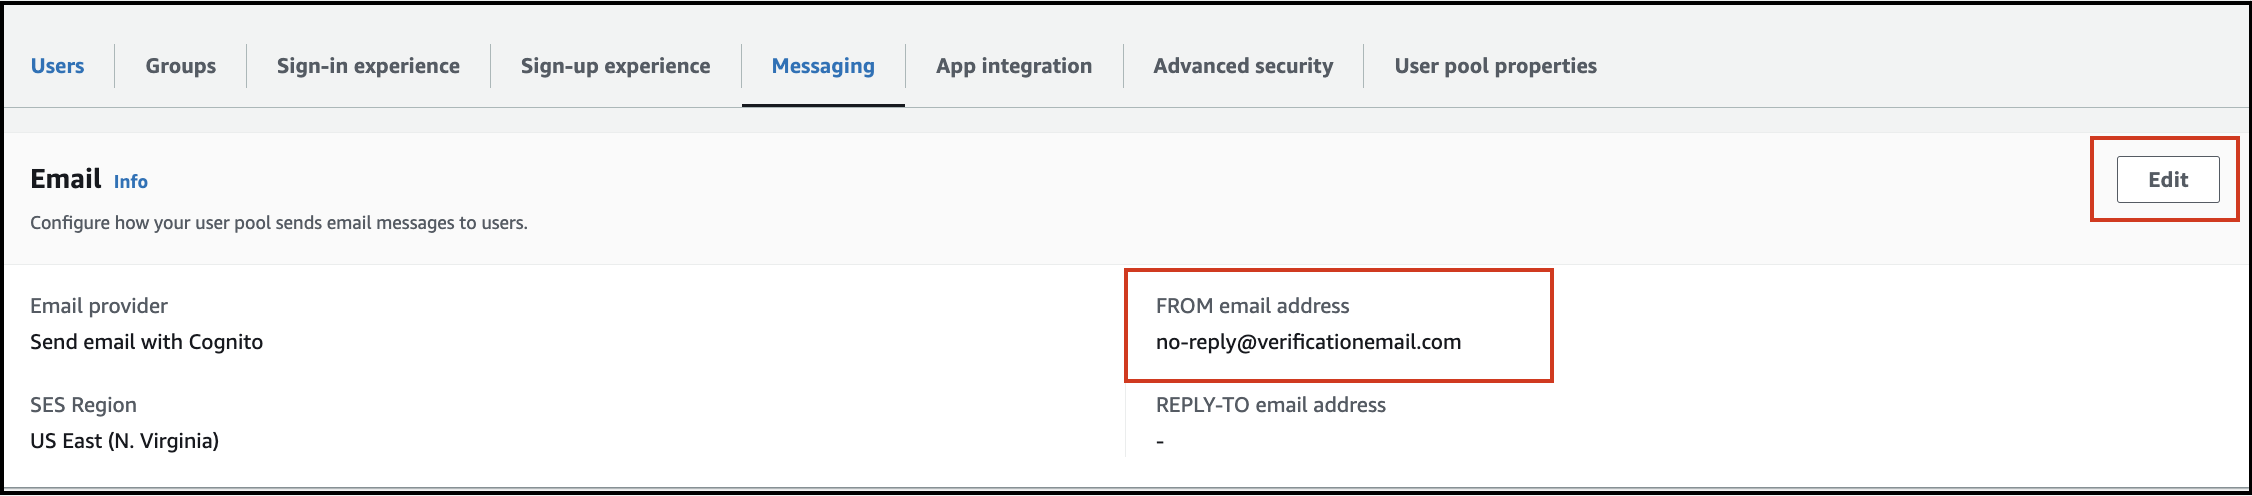
Messagingin the menu list.
- Open Amazon
-
Check Email provider settings.
- In the
Email providersection, review the current configuration and the email address used to send emails. - Ensure that
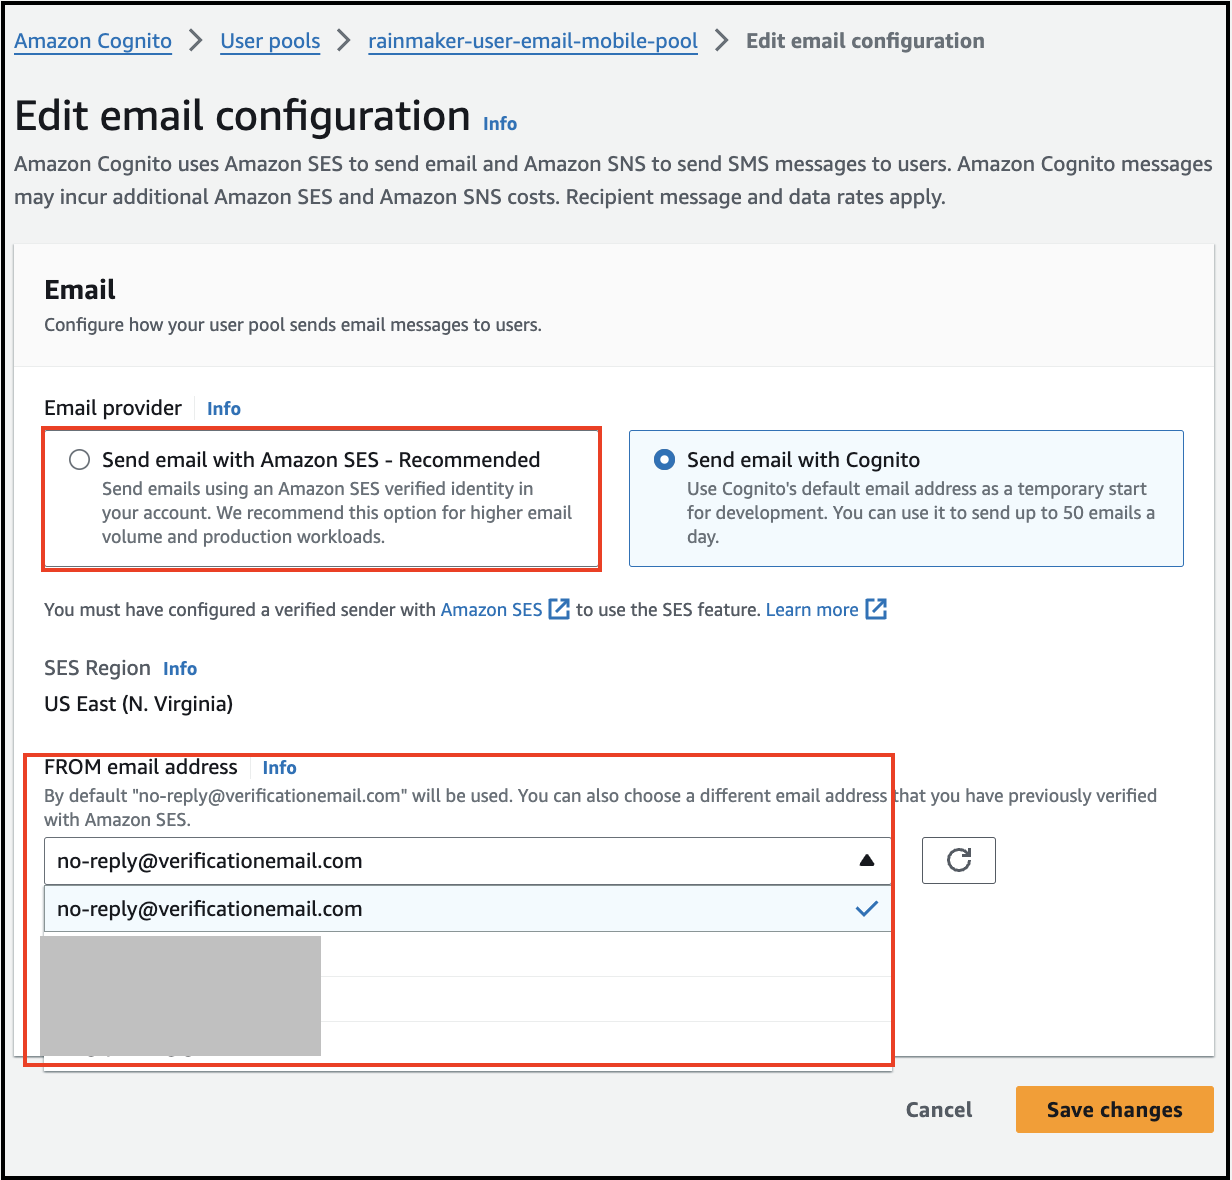
Send email with Amazon SESis selected as the email provider.
- In the
-
Configure the SES Email Address.
- Select an email address from the verified list in Amazon SES.
- Click
Save Changesto apply the new configuration.
By completing these steps, emails should be sent from the specified SES email address instead of the default no-reply@verificationemail.com.
Configure SES to Send Email
When a new user is created, RainMaker sends an email notification to the end-users, which contains a verification code. By default Amazon Cognito is used to send these email notifications. However, Amazon Cognito's default email service limits the number of emails sent to 50 per day. This includes all types of emails, such as verification codes sent during user sign-up or password recovery. Therefore, Amazon SES needs to be configured for sending the email notifications to the user instead of relaying on Amazon Cognito. By using SES, it can also support message customizations.
This feature is not supported for OAuth-only RainMaker yet.
Follow these steps to configure SES to send emails:
- Log in to the RainMaker dashboard with Superadmin credentials.
- Go to the
Deployment Settingstab. - Click
Email Configurations.
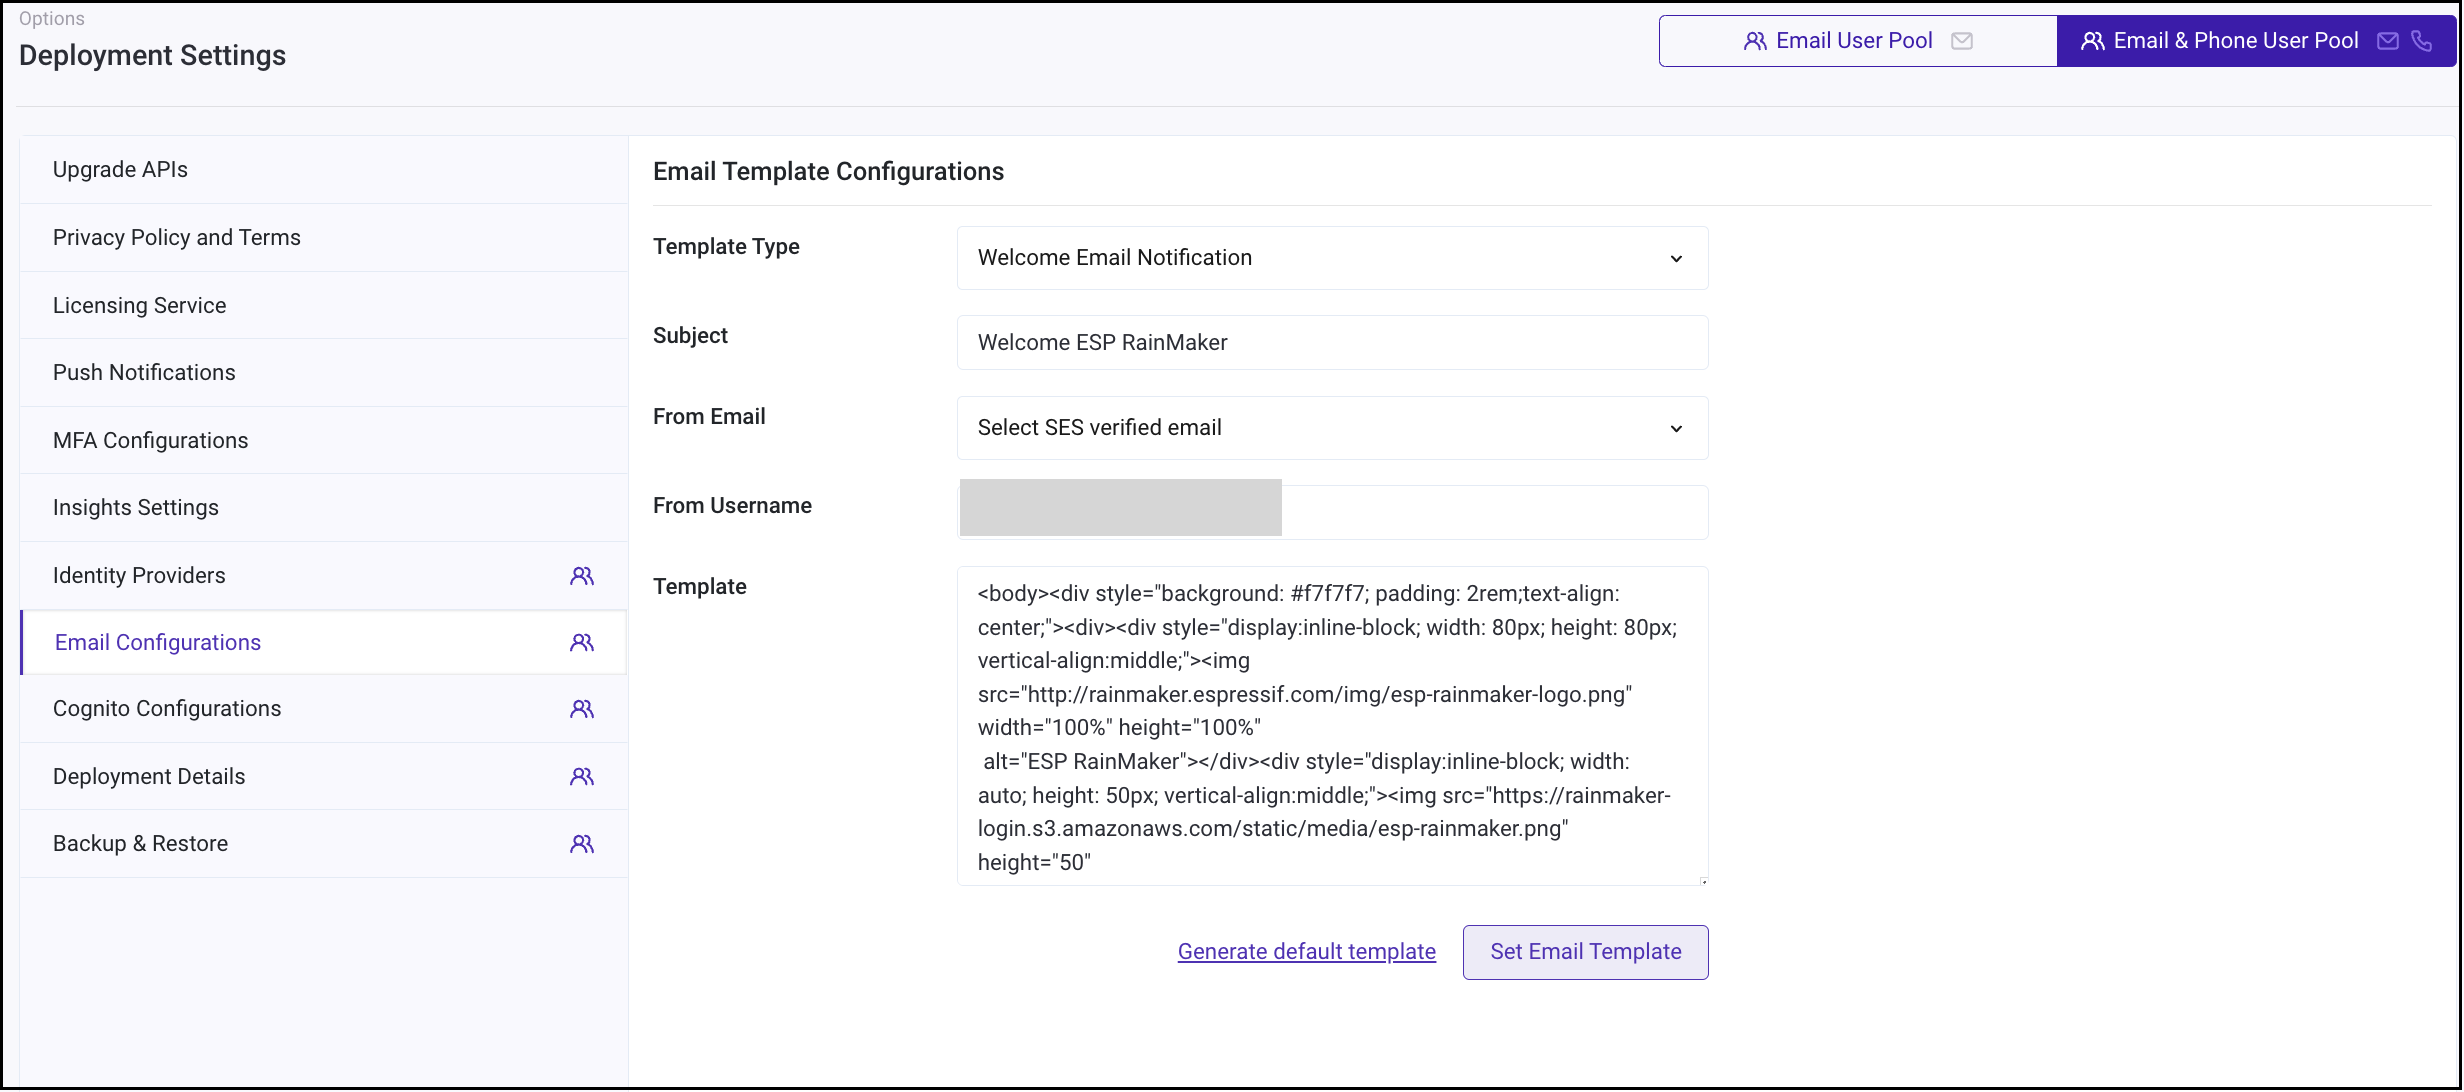
- Enter the email subject.
- Choose an email address for sending emails.
- Enter your name for
From Username. - Enter email body in
Template. - Click
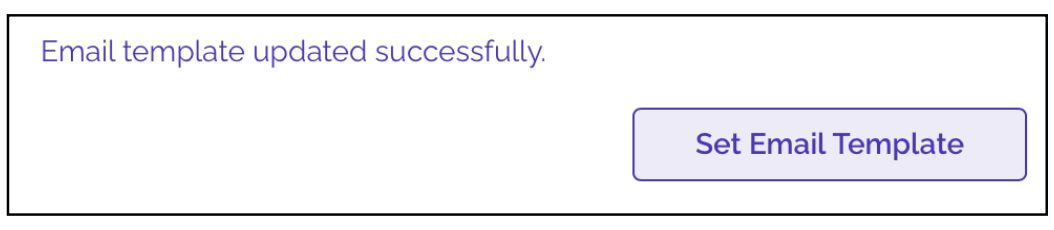
Set Email Template. - You will get a success message as shown below:
Configure the Email Template for Verification Messages
When the user signs up, the RainMaker platform sends them an email containing a verification code. This verification code must be used to confirm accounts when logging in using the mobile Apps. You can customize the email template from the RainMaker dashboard, but admin privileges are required to make changes to the template.
Follow these steps to configure email template for verification messages:
- Log in to the RainMaker dashboard using your Admin account credentials.
- Click
Deployment Settings. - Click the
Email Configurationstab.

- Keep the template type as
Welcome Email Notification.- You can change the
Subjectof the Email. - You can change the
Template, as per your requirement. This template can be simple text or a valid HTML. - Please note that you will need to have the string
{####}in the template. This is a placeholder string, which is filled by the AWS service with the verification code.
- You can change the
- After your changes are done, click
Set Email Template.
With this setup, the verification email sent to new users will use the customized template.
Configure Cognito Domain
Cognito domain is required for implementing sign-in using third party identity providers (e.g., Google, Apple) and for linking your Alexa or Google Voice Assistants account with your RainMaker account.
The Cognito domain is used to form the URL of sign-in and sign-up webpages, that are used for third party identity providers and voice assistant integrations.
This is not relevant for OAuth-only RainMaker.
Follow these steps to configure the Cognito domain name:
- Log in to RainMaker dashboard with Superadmin credentials.
- Go to
Deployment Settingstab. - Go to
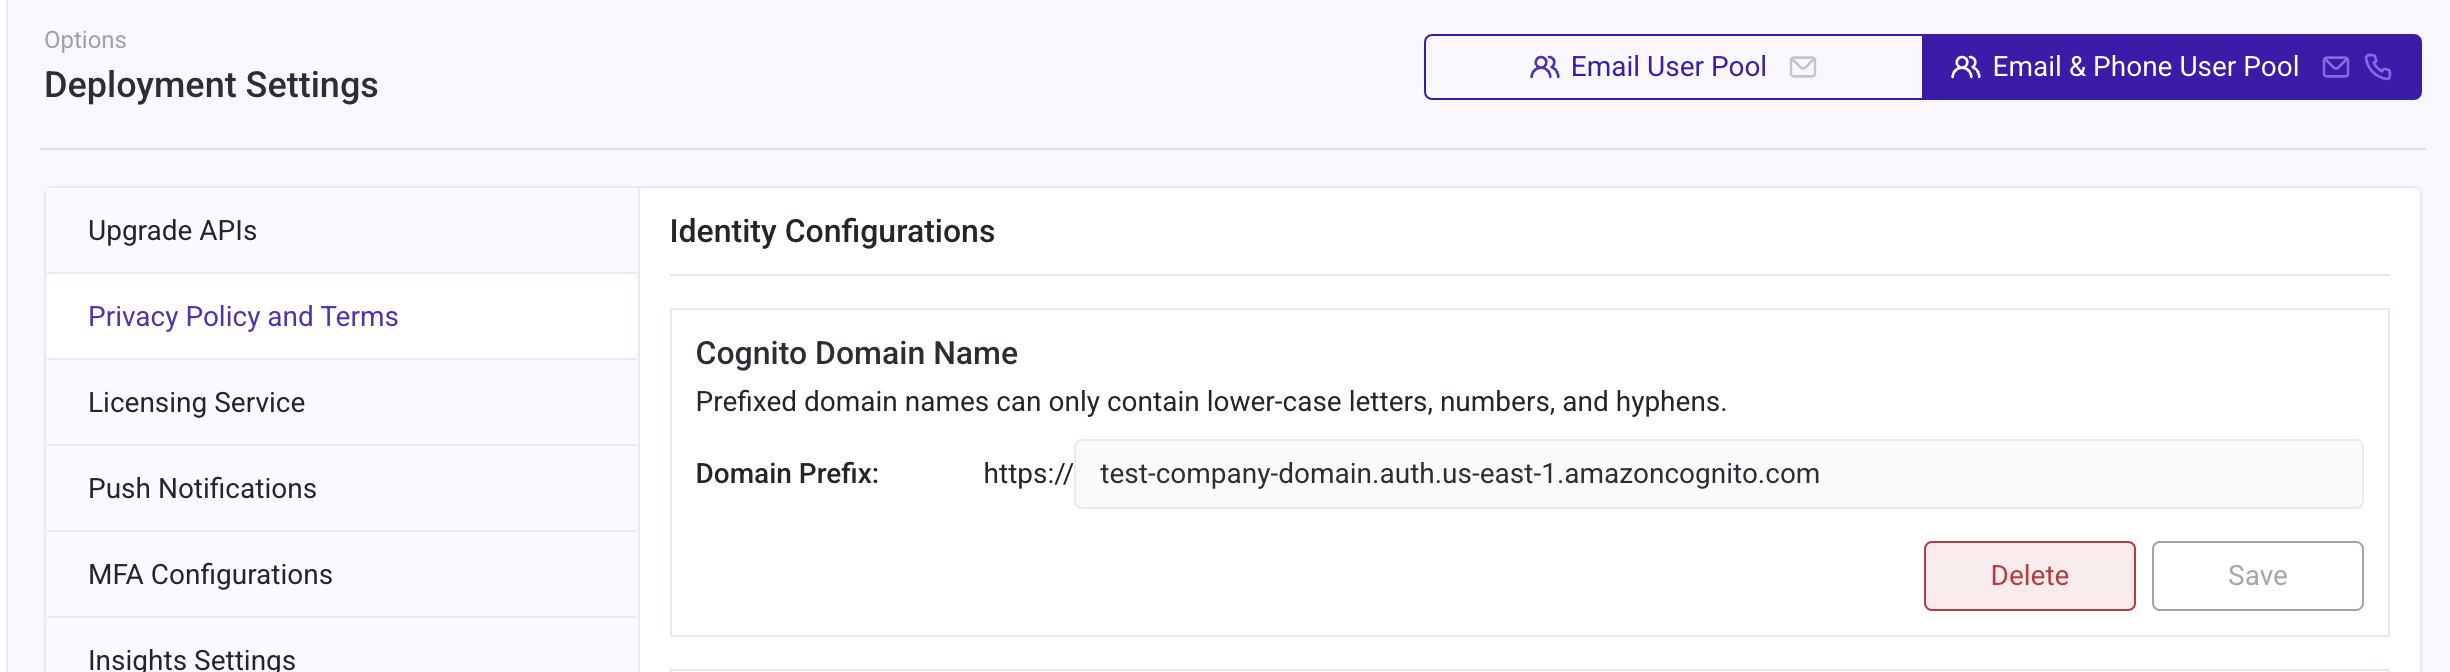
Identity Configurationstab. - Enter the value for the custom domain name as shown below:
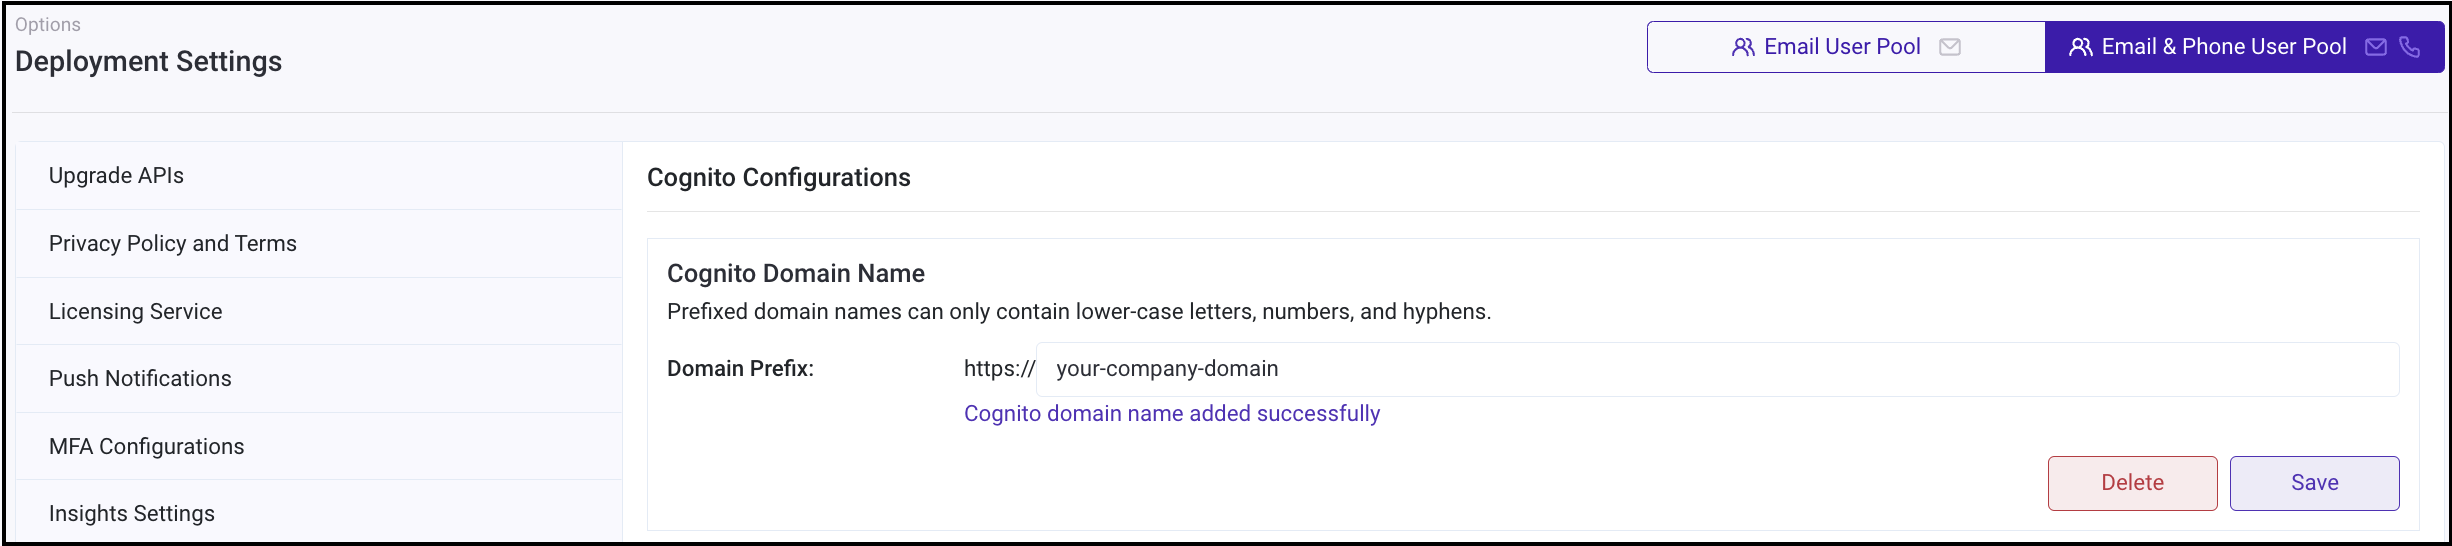
Cognito domain names can only contain lower-case letters, numbers, and hyphens.
- Click
Saveand refresh the page to view the full URL if it is not generated automatically.
Configure Cognito Callback URL (Optional)
The callback URLs are needed while using the third party authenticating services and linking your account in Alexa/Google Voice Assistants with your account in RainMaker. After successful sign-in, users are redirected to one of the URLs specified in callback URLs.
Follow these steps to configure the Callback URLs are given below:
- Log in to RainMaker dashboard with Superadmin credentials.
- Go to
Deployment Settingstab. - Go to
Cognito Configurationstab. - Enter your callback URLs as shown below. Multiple callback URLs can be specified by entering a comma after each URL.
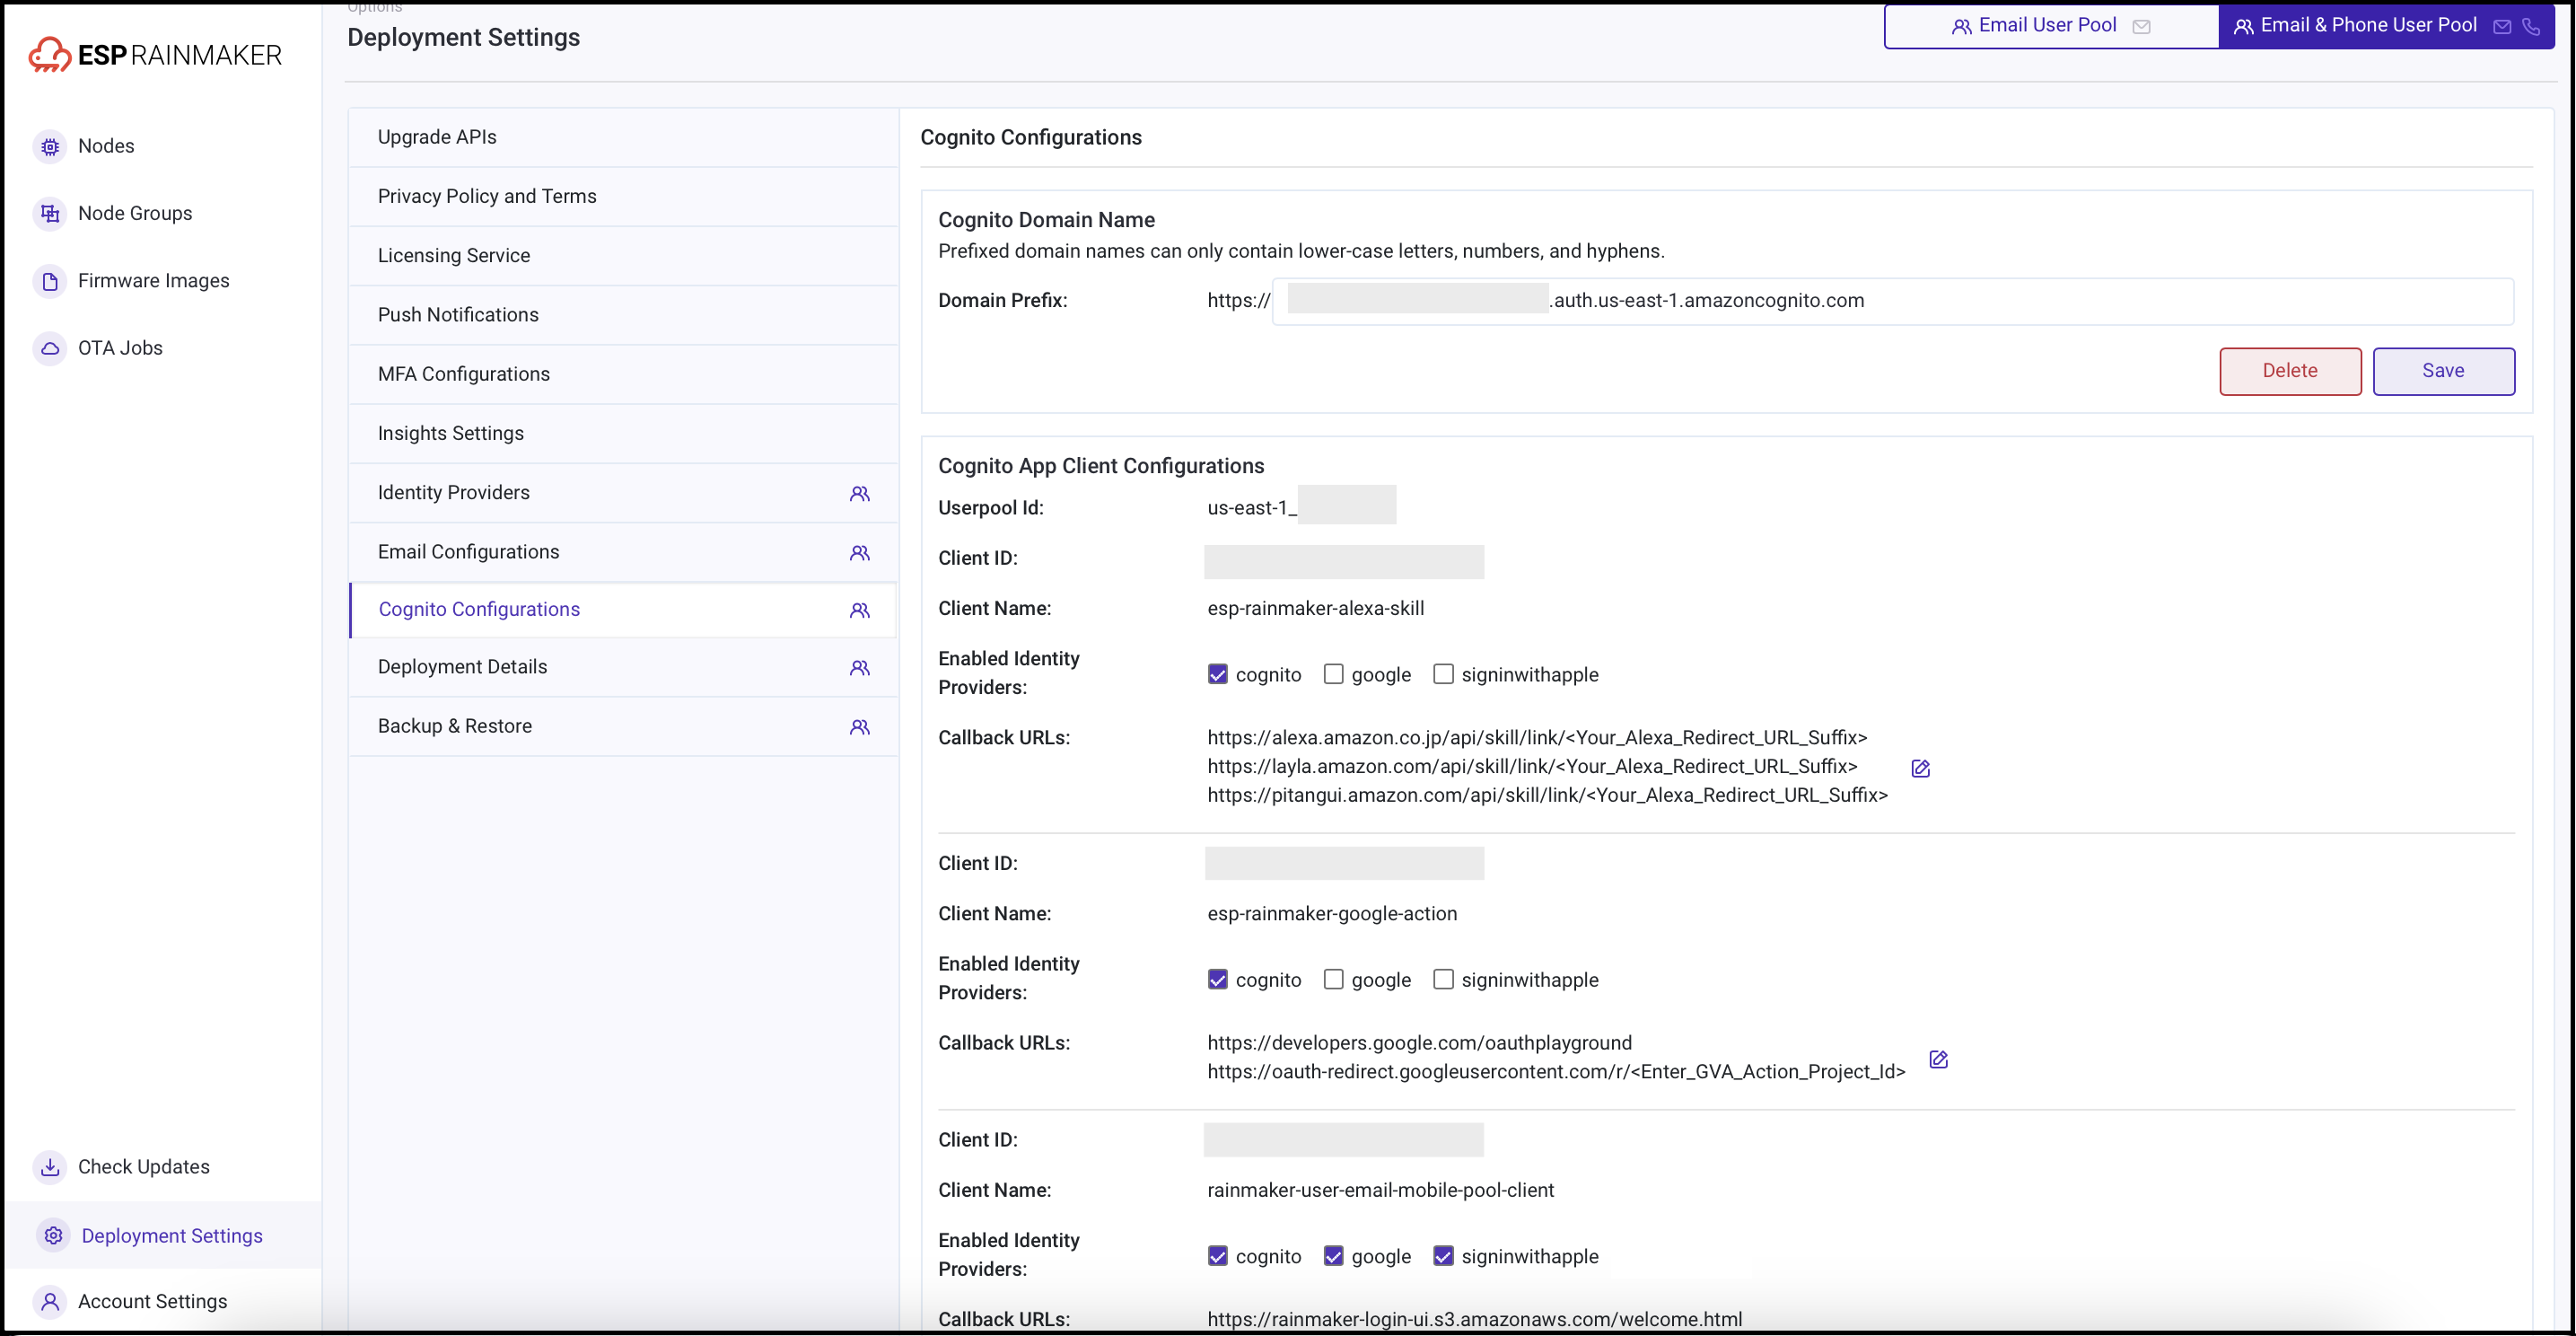
Configuring Custom Cognito Domain (Optional)
This is not relevant for Oauth-only RainMaker.
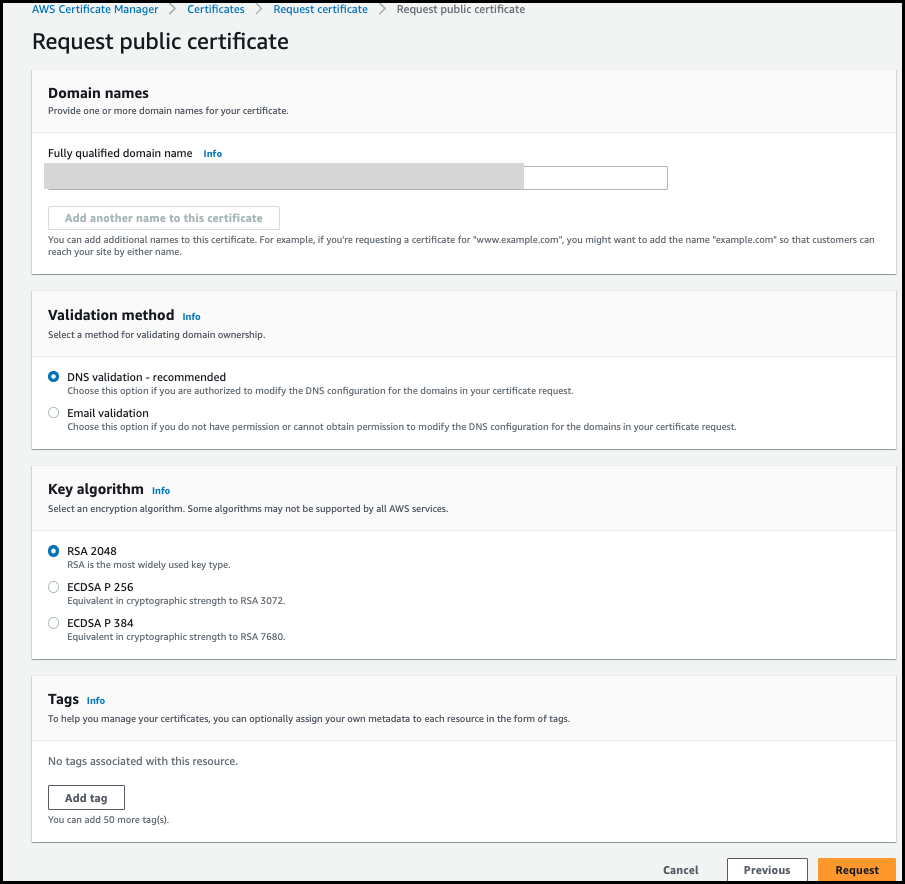
1. Create ACM certificate
AWS Certificate Manager (ACM) handles the complexity of creating, storing, and renewing public and private SSL/TLS X.509 certificates and keys that protect your AWS websites and applications. You can provide certificates for your integrated AWS services either by issuing them directly with ACM or by importing third-party certificates into the ACM management system.
- Sign in to the AWS console and search for AWS Certificate Manager service.
- Click
Request Certificate. - Select
request a public certificateoption, then clickNext. - Enter
Fully qualified domain name, then clickRequest.
Add a CNAME record for certificate validation
In this step, you create a CNAME record in Route 53 using the CNAME name and CNAME value from the previous step to validate your SSL certificate.
- Sign in to the Route 53 console.
- In the navigation pane, choose
Hosted zones. - Select the hosted zone for your domain.
- Choose
Create record. - For
Record name, enter the CNAME name (without your domain name, as Route53 will append it automatically). - For
Record type, selectCNAME. - For
Value, enter the CNAME value copied from the ACM certificate. - Keep
TTLas default (300 seconds). - Ensure that
Aliasis not selected. - Choose
Create record. - Wait for approximately 30 minutes for your certificate status to move from
Pending validationtoIssued(verified).
The CNAME record type is used for certificate validation and should not have the Alias option enabled.
2. Creating a custom domain and adding it to the user pool
Here, you need to enter a custom domain name, and select ACM certificate from the drop down arrow that we created in the previous step.
-
Sign in to the Amazon Cognito console.
-
Click
User pools. -
Choose the
rainmaker-user-email-mobile-poolto which you want to add your domain. -
Click on the
App integrationtab.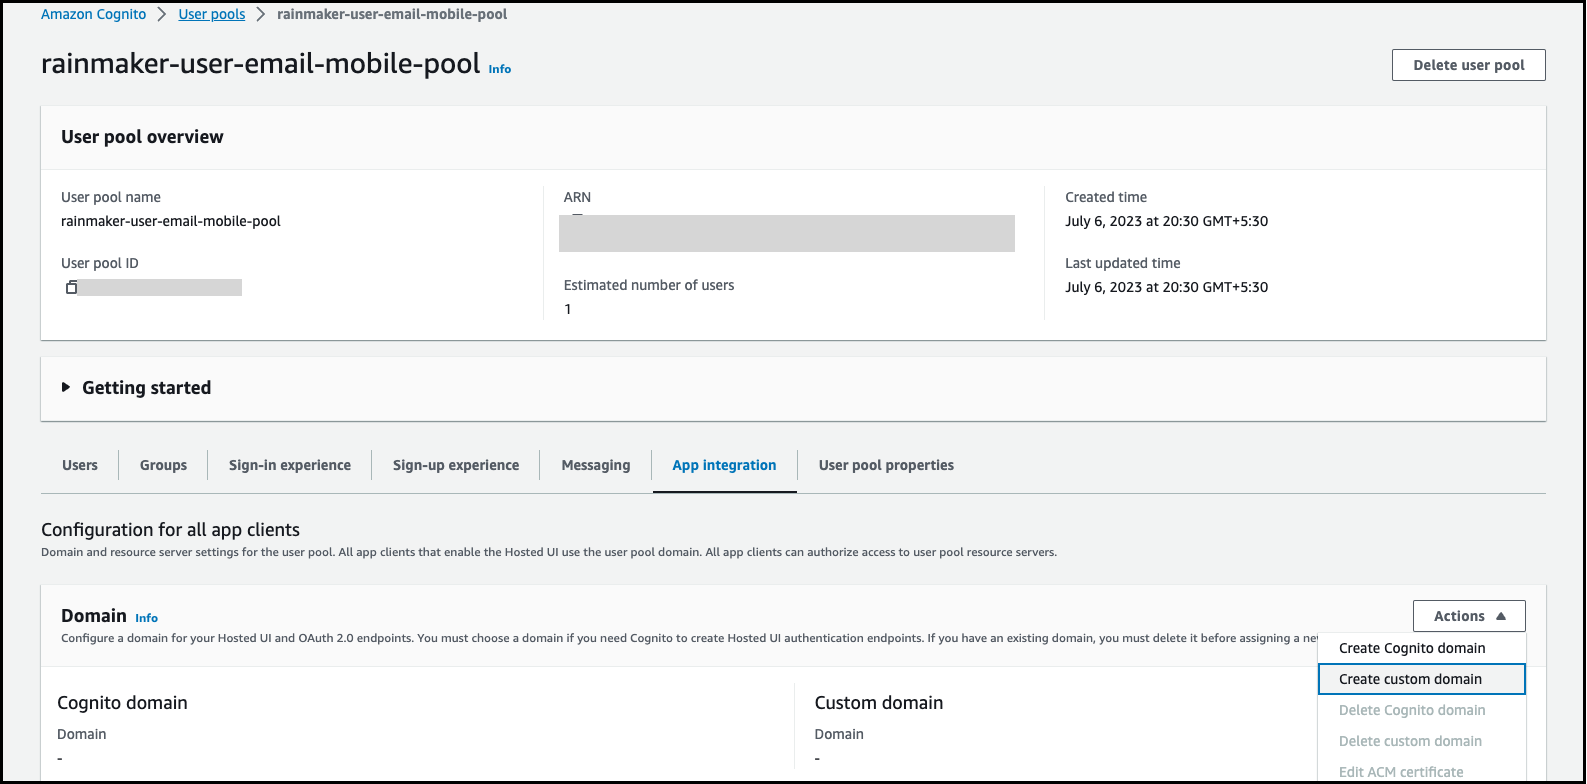
-
Next to
Domain, chooseActions, then chooseCreate custom domain. -
For
Custom domain, enter the URL of the domain you want to use with Amazon Cognito. Your domain name can include only lowercase letters, numbers, and hyphens. Do not use a hyphen for the first or last character. Use periods to separate subdomain names. -
For
ACM certificate, choose the SSL certificate that you want to use for your domain. Only ACM certificates in US East (N. Virginia) are eligible to use an Amazon Cognito custom domain, regardless of the AWS region of your user pool. -
Click
Create custom domain.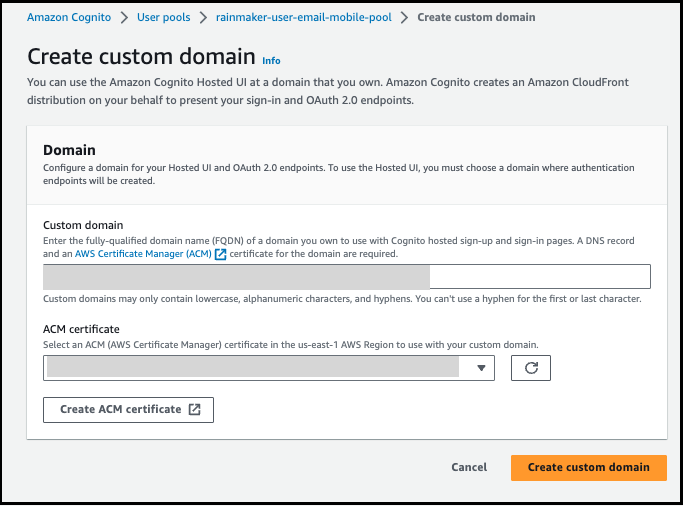
-
Amazon Cognito returns you to the
App integrationtab. A message titled "Create an alias record in your domain's DNS" is displayed. Note down the Domain and Alias target displayed in the console. They will be used in the next step to direct traffic to your custom domain.
3. Add an alias target and subdomain
In this step, you set up an alias through your Domain Name Server (DNS) service provider that points back to the alias target from the previous step.
A) To add an alias target and subdomain to your current DNS configuration
If you are not using Route 53 for DNS address resolution, then you must use your DNS service provider's configuration tools to add the alias target from the previous step to your domain's DNS record. Your DNS provider will also need to set up the subdomain for your custom domain.
B) To add an alias target and subdomain using Route 53
If you are using Route 53, follow these steps:
-
Sign in to the Route 53 console.
-
If you do not have a hosted zone in Route 53, you must create one using the following steps. Otherwise, continue to step 3.
a) Choose
Create Hosted Zone.
b) Enter the parent domain (e.g., auth.example.com) of your custom domain (e.g., myapp.auth.example.com) from theDomain Namelist.
c) (Optional) ForComment, enter a comment about the hosted zone.
d) Choose a hosted zone type of public hosted zone to allow public clients to resolve your custom domain. Choosing private hosted zone is not supported.
e) ApplyTagsas desired.
f) ChooseCreate hosted zone. -
On the
Hosted Zonespage, choose the name of your hosted zone. -
Add a DNS record for the parent domain and choose
Create records.An example record for the domain auth.example.com: auth.example.com. 60 IN A 198.51.100.1
Amazon Cognito verifies that there is a DNS record for the parent domain of your custom domain to protect against accidental hijacking of production domains. If you do not have a DNS record for the parent domain, Amazon Cognito will return an error when you attempt to set the custom domain.
-
Choose
Create recordagain. -
Enter a
Record namethat matches your custom domain, for example, myapp to create a record for myapp.auth.example.com. -
Enter the alias target name that you previously noted into
Alias Target. -
Enable the
Aliasoption. -
Choose
Route traffic toan Alias for your Cloudfront distribution. Enter the alias target provided by Amazon Cognito when you created your custom domain. -
Choose Create Records.
Your new records can take around 60 seconds to propagate to all Route 53 DNS servers. You can use the Route 53 GetChange API method to verify that your changes have propagated.
4. Verify your sign-in page
Verify that the sign-in page is available on your custom domain by following these steps:
- Sign in to the Amazon Cognito console.
- Select the user pool
rainmaker-user-email-mobile-pool. - From the left navigation menu, click on the
App clientsoption. - Click on
rainmaker-user-email-mobile-pool-client. - Click on the
View login pageoption on the right side of the client name.

Reference link: https://docs.aws.amazon.com/cognito/latest/developerguide/cognito-user-pools-add-custom-domain.html
Configuring Custom IoT MQTT Domain (Optional)
1. Create ACM certificate
AWS Certificate Manager (ACM) handles the complexity of creating, storing, and renewing public and private SSL/TLS X.509 certificates and keys that protect your AWS websites and applications. You can provide certificates for your integrated AWS services either by issuing them directly with ACM or by importing third-party certificates into the ACM management system.
- Sign in to the AWS console & search for AWS Certificate Manager service.
- Click on
Request Certificate. - Select
request a public certificateoption, then clickNext. - Enter
Fully qualified domain name. - Keep
Validation MethodasDNS Validation, andKey AlgorithmasRSA 2048. Click onRequest. - Copy CNAME name and CNAME value.
- Add these records as CNAME in Route53 (see detailed steps below).
Add a CNAME record for certificate validation
See this step.
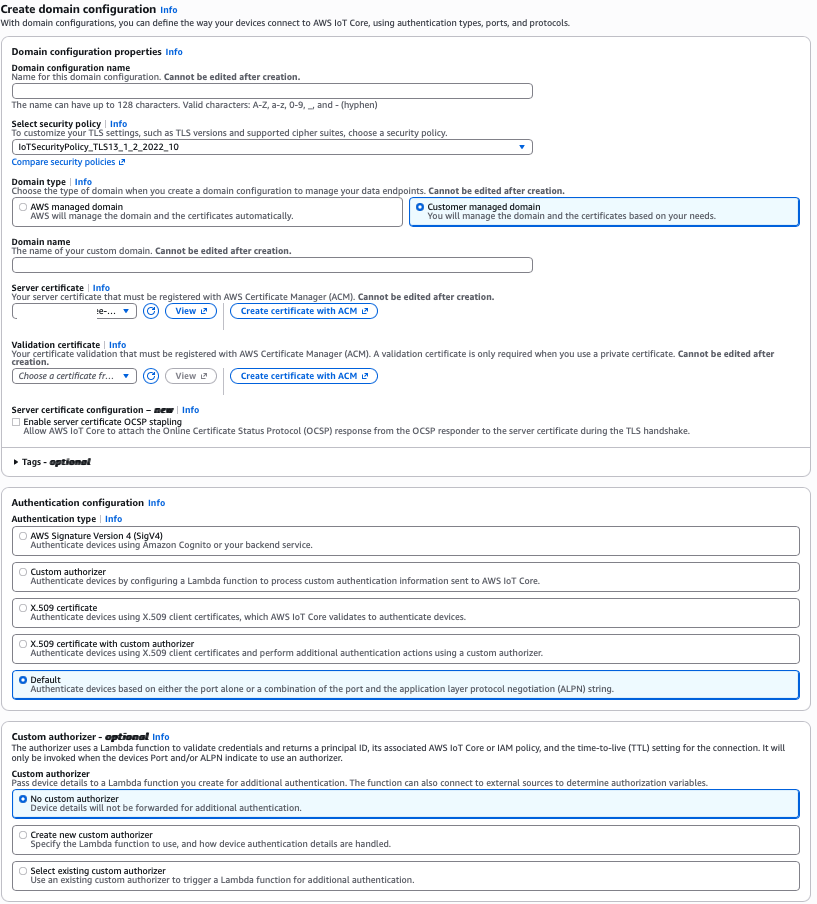
2. Creating an IoT MQTT custom domain
Here, you need to create a custom domain configuration for AWS IoT and select the ACM certificate that we created in the previous step.
- Sign in to the AWS console and search for
AWS IoT Coreservice. - In the navigation pane, choose
Domain configurations. - Choose
Create domain configuration. - In the
Domain configuration propertiessection:- For
Domain configuration name, enter a unique name (e.g.,esp-rainmaker-<account_id>). - For
Select security policy, keep defaultIoTSecurityPolicy_TLS13_1_2_2022_10.
- For
- In the
Domain typesection, selectCustomer managed domain. - For
Domain name, enter your custom MQTT domain (e.g.,mqtt.example.com). - For
Server certificate, select the ACM certificate created in the previous step from the dropdown. - For
Validation certificate, choose the appropriate certificate if using a private certificate (optional). - In the
Authentication configurationsection, keep defaultDefaultas theAuthentication type. - In the
Custom authorizersection, keepNo custom authorizer. - Click on
Create domain configuration.
- After creation, you can see your domain configuration listed in the
Domain configurationspage. Note down theDomain namefrom the list (e.g.,********-ats.iot.<region>.amazonaws.com) – this is your IoT Data-ATS endpoint that you'll need for the CNAME record.
3. Add CNAME record for MQTT custom domain
In this step, you create a CNAME record in Route53 that points your custom MQTT domain to the AWS IoT Data-ATS endpoint.
Follow the same Route53 steps in Add a CNAME record for certificate validation, but use the following values:
Record name: Enter the subdomain part of your MQTT custom domain (e.g.,mqtt.example.com).Value: Enter your AWS IoT Data-ATS endpoint (obtained from step 13 in Creating an IoT MQTT custom domain section, e.g.,********-ats.iot.<region>.amazonaws.com).
- The CNAME record maps your custom MQTT domain to the AWS IoT Data-ATS endpoint.
- Make sure to use the correct IoT endpoint for your AWS region.
- DNS propagation may take a few minutes to complete.
Your new CNAME record will allow MQTT clients to connect to your custom domain (e.g., mqtt.example.com) which will route to the AWS IoT endpoint.
Configure MFA (Optional)
Admin users can set up multi-factor authentication (MFA) for higher security. This will send a verification code to the admin's phone number at each login.
Increase the SNS sending limit if not done already before going further.
This is not supported for OAuth-only RainMaker yet.
Follow these steps to configure MFA:
-
Log in to RainMaker dashboard with your admin account.
Go toDeployment Settings>MFA Configuration.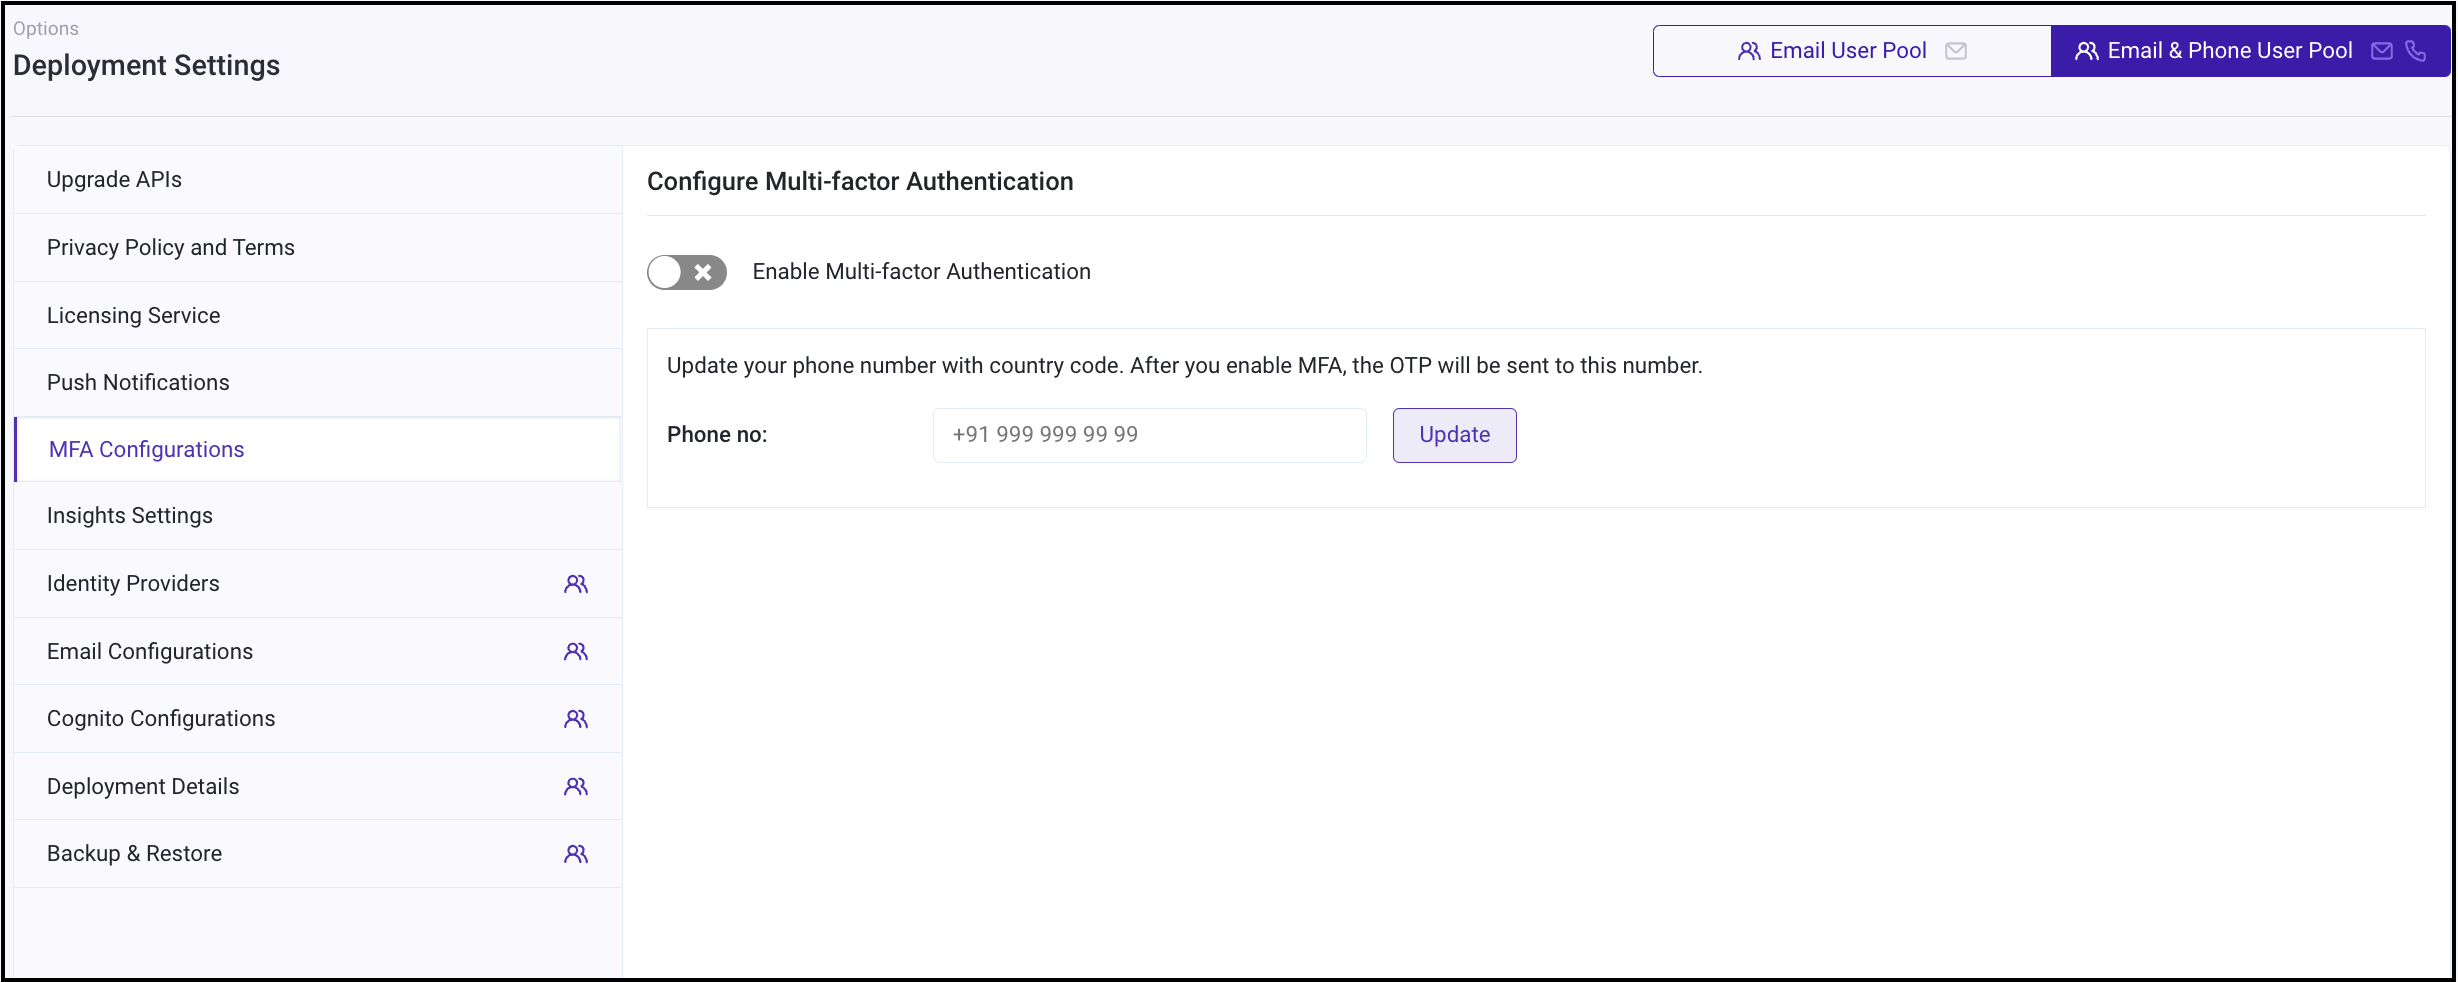
-
To add or update phone number on which you wish to receive the verification code, enter the number along with the country code and click
Update.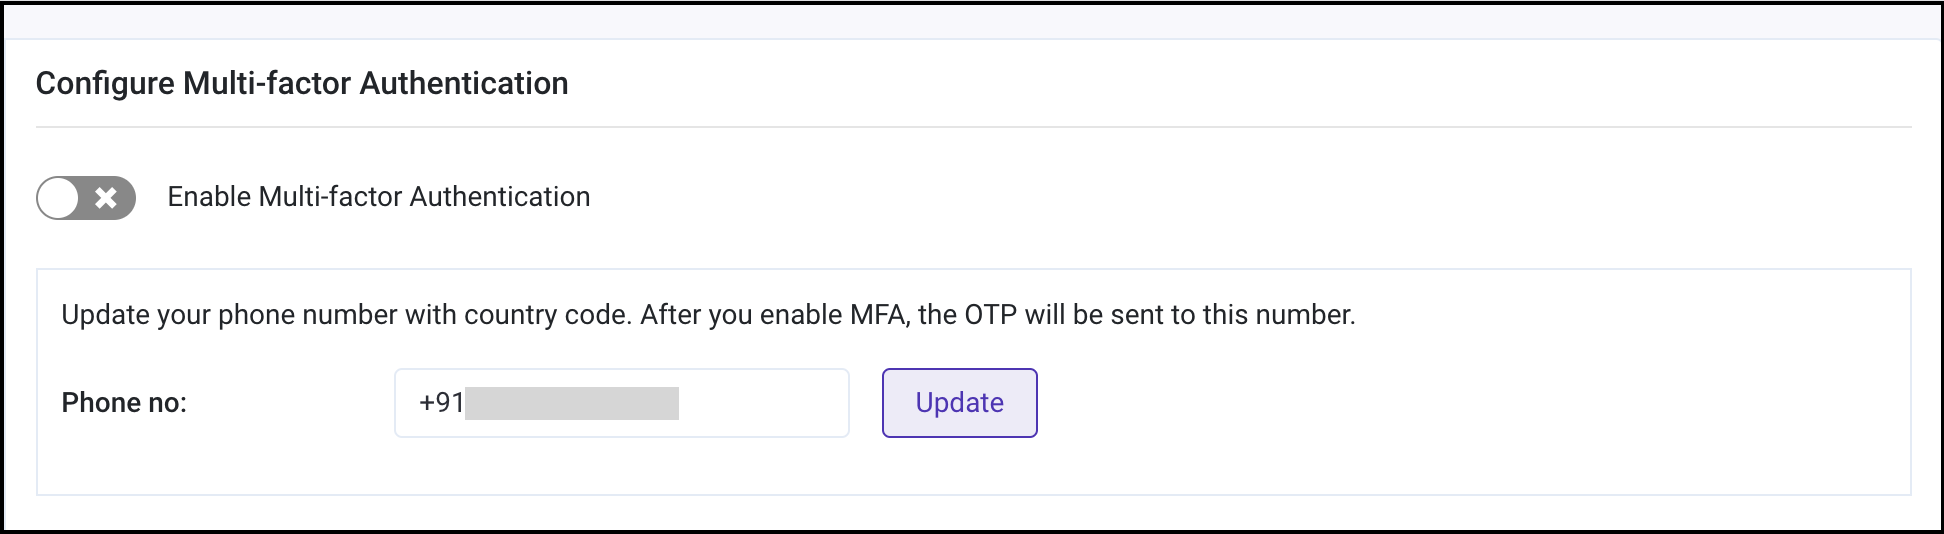 tip
tipYou may skip step 2 and 3 if you have already added the phone number.
-
Verify the phone number by entering the verification code sent to the updated phone number.
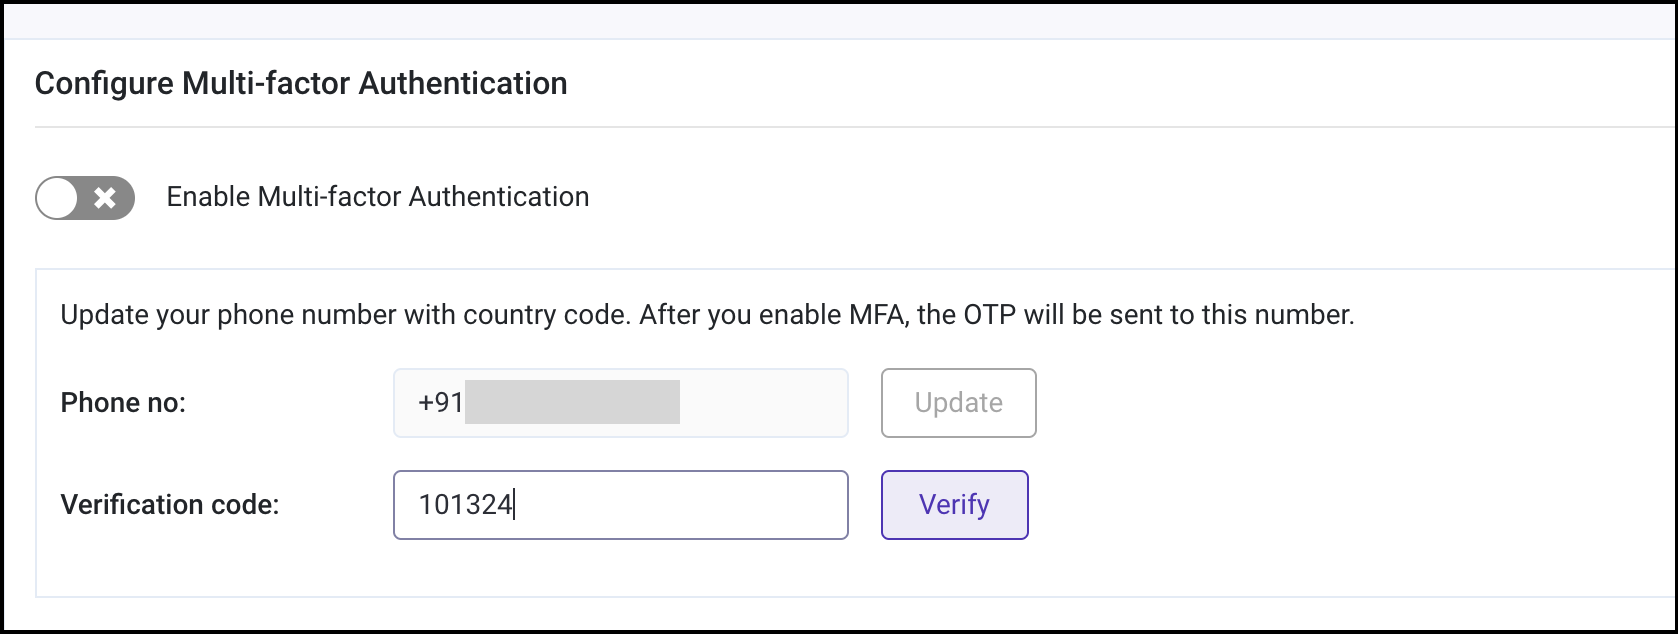
-
Your phone number is now updated. You can enable MFA using the toggle.
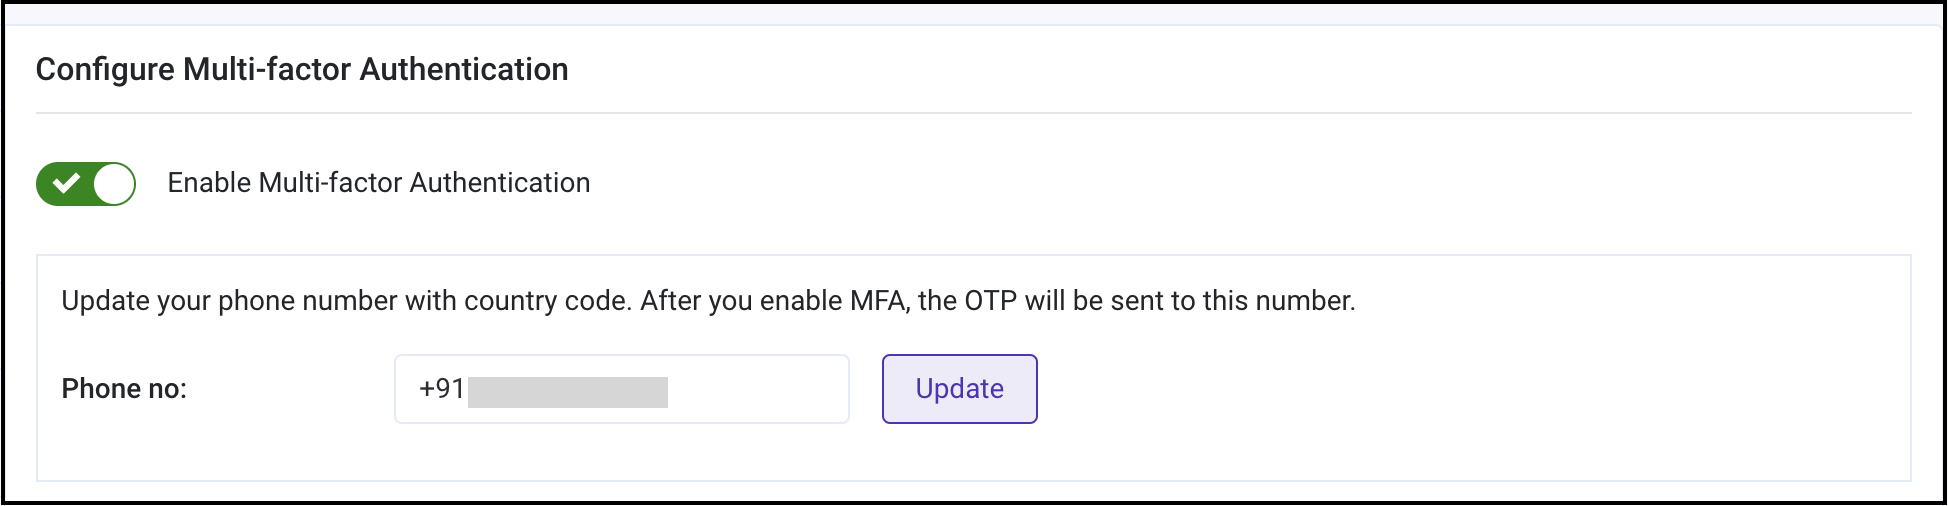 tip
tipYou can also disable MFA any time using the same toggle.
-
MFA settings updated successfully.
tipThe settings will reflect from the next login onwards.
If enabled, an MFA prompt will appear after the initial password authentication:
Configure the Location-based Triggers for Weather API Configurations
This process enables location-based weather triggers for automation through the integration of the OpenWeather API with RainMaker.
By configuring the API key and setting up polling intervals, devices or systems can automatically respond to weather conditions such as temperature or humidity. This enhances automation by allowing actions like turning on or off devices based on real-time weather data, providing greater customization and efficiency. It adds intelligent, dynamic responses to weather changes, improving convenience and energy management in smart environments.
Follow these steps to configure location-based weather triggers for Weather API Configurations:
- Create Open-Weather account
- Begin the process by signing up for an account at https://home.openweathermap.org/users/sign_up.
- After signing up, check your email for a verification message and follow the instructions to confirm your email address.
- Once your email is verified, you will receive an email containing the API key, which will become active within the next couple of hours.
- Steps for configuring weather-based automation in RainMaker
-
In Postman, log in to RainMaker using Superadmin credentials.

-
Access and configure the deployment settings for location triggers by clicking on the following Swagger link:
https://swaggerapis.rainmaker.espressif.com/?urls.primaryName=RainMaker%20Superadmin%20APIs#/Deployment%20Setting/cofigureServiceConfiguration -
Under the
Request body, chooseLocation Trigger Configurationsfrom the dropdown list to see the sample JSON request.
-
In Postman, create a new API request.
PUT - {{url}}/v1/admin/deployment_settings/config/location_triggerFollow Get Base Url steps to fetch the
{{url}}.
-
| Key | Value |
|---|---|
| service | location_trigger |
| Key | Value |
|---|---|
| Authorization | {{access_key}} |
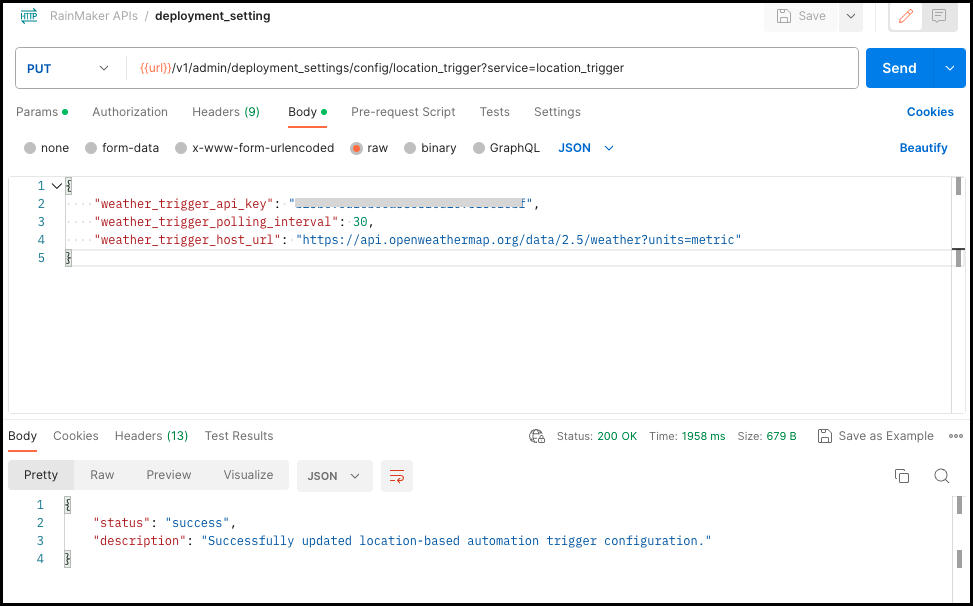
Select node_id, choose JSON from the dropdown list. Add the following JSON to the body, and click Send.
 {
    "weather_trigger_api_key": "<add_your_key>",

    "weather_trigger_polling_interval": 30,

    "weather_trigger_host_url": "https://api.openweathermap.org/data/2.5/weather?units=metric"

 }
Refer to the screenshot below for an example of the required input.
-
Test the triggers
-
To get a sample request, visit link:
https://swaggerapis.rainmaker.espressif.com/#/Automation%20Trigger%20and%20Actions/addAutomationTriggerActionUnder the
Request body, chooseAdd Weather-based Automation Triggerfrom the dropdown list.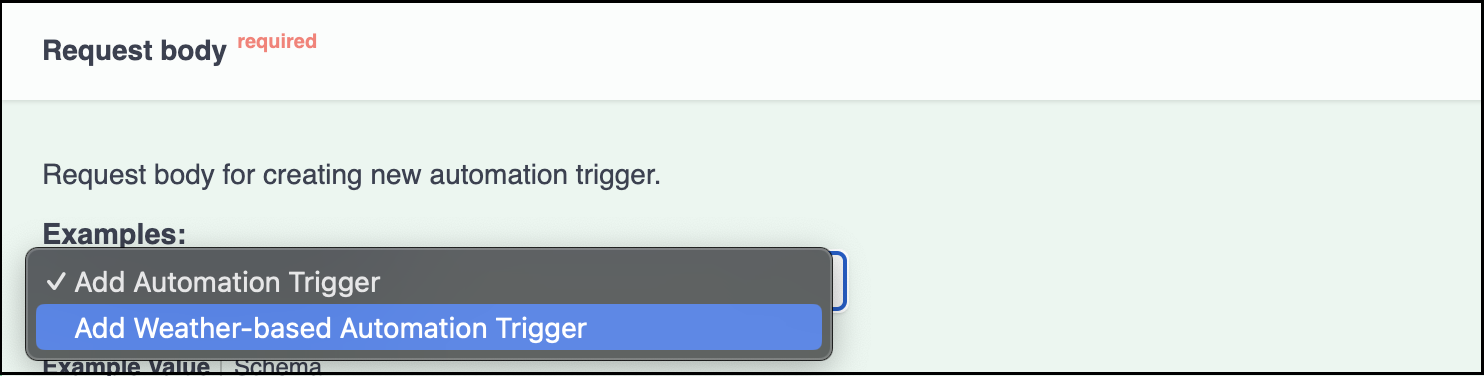
-
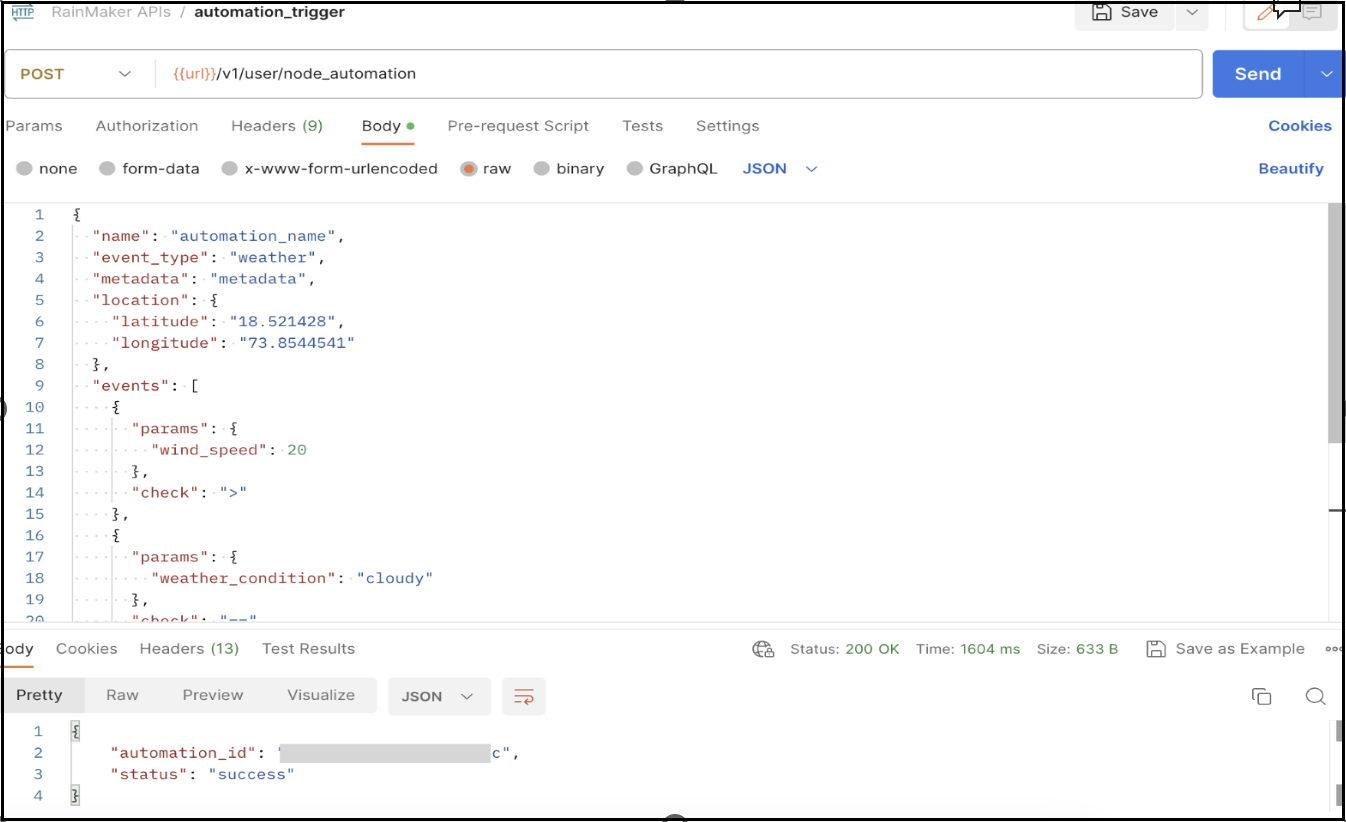
In Postman, create a new API request.
POST - {{url}}/v1/user/node_automation
Header -
| Key | Value |
|---|---|
| Authorization | {{access_key}} |
Change the node_id value according to the node on which you want to apply automation trigger.
Downgrade Cognito User Pool from Essentials to Lite Tier
When downgrading a Cognito User Pool from the Essentials tier to the Lite tier, certain features exclusive to Essentials must be disabled. This ensures a seamless downgrade without errors. If you attempt to downgrade while advanced features are still enabled, you will receive a tierChangeNotAllowedException error. Follow the steps below to disable all required advanced features before confirming the tier change via API.
For each step, if the advanced feature is already absent or not configured, you may skip to the next section.
1. Remove Access Token Customization
-
In the AWS Console, open your user pool.
-
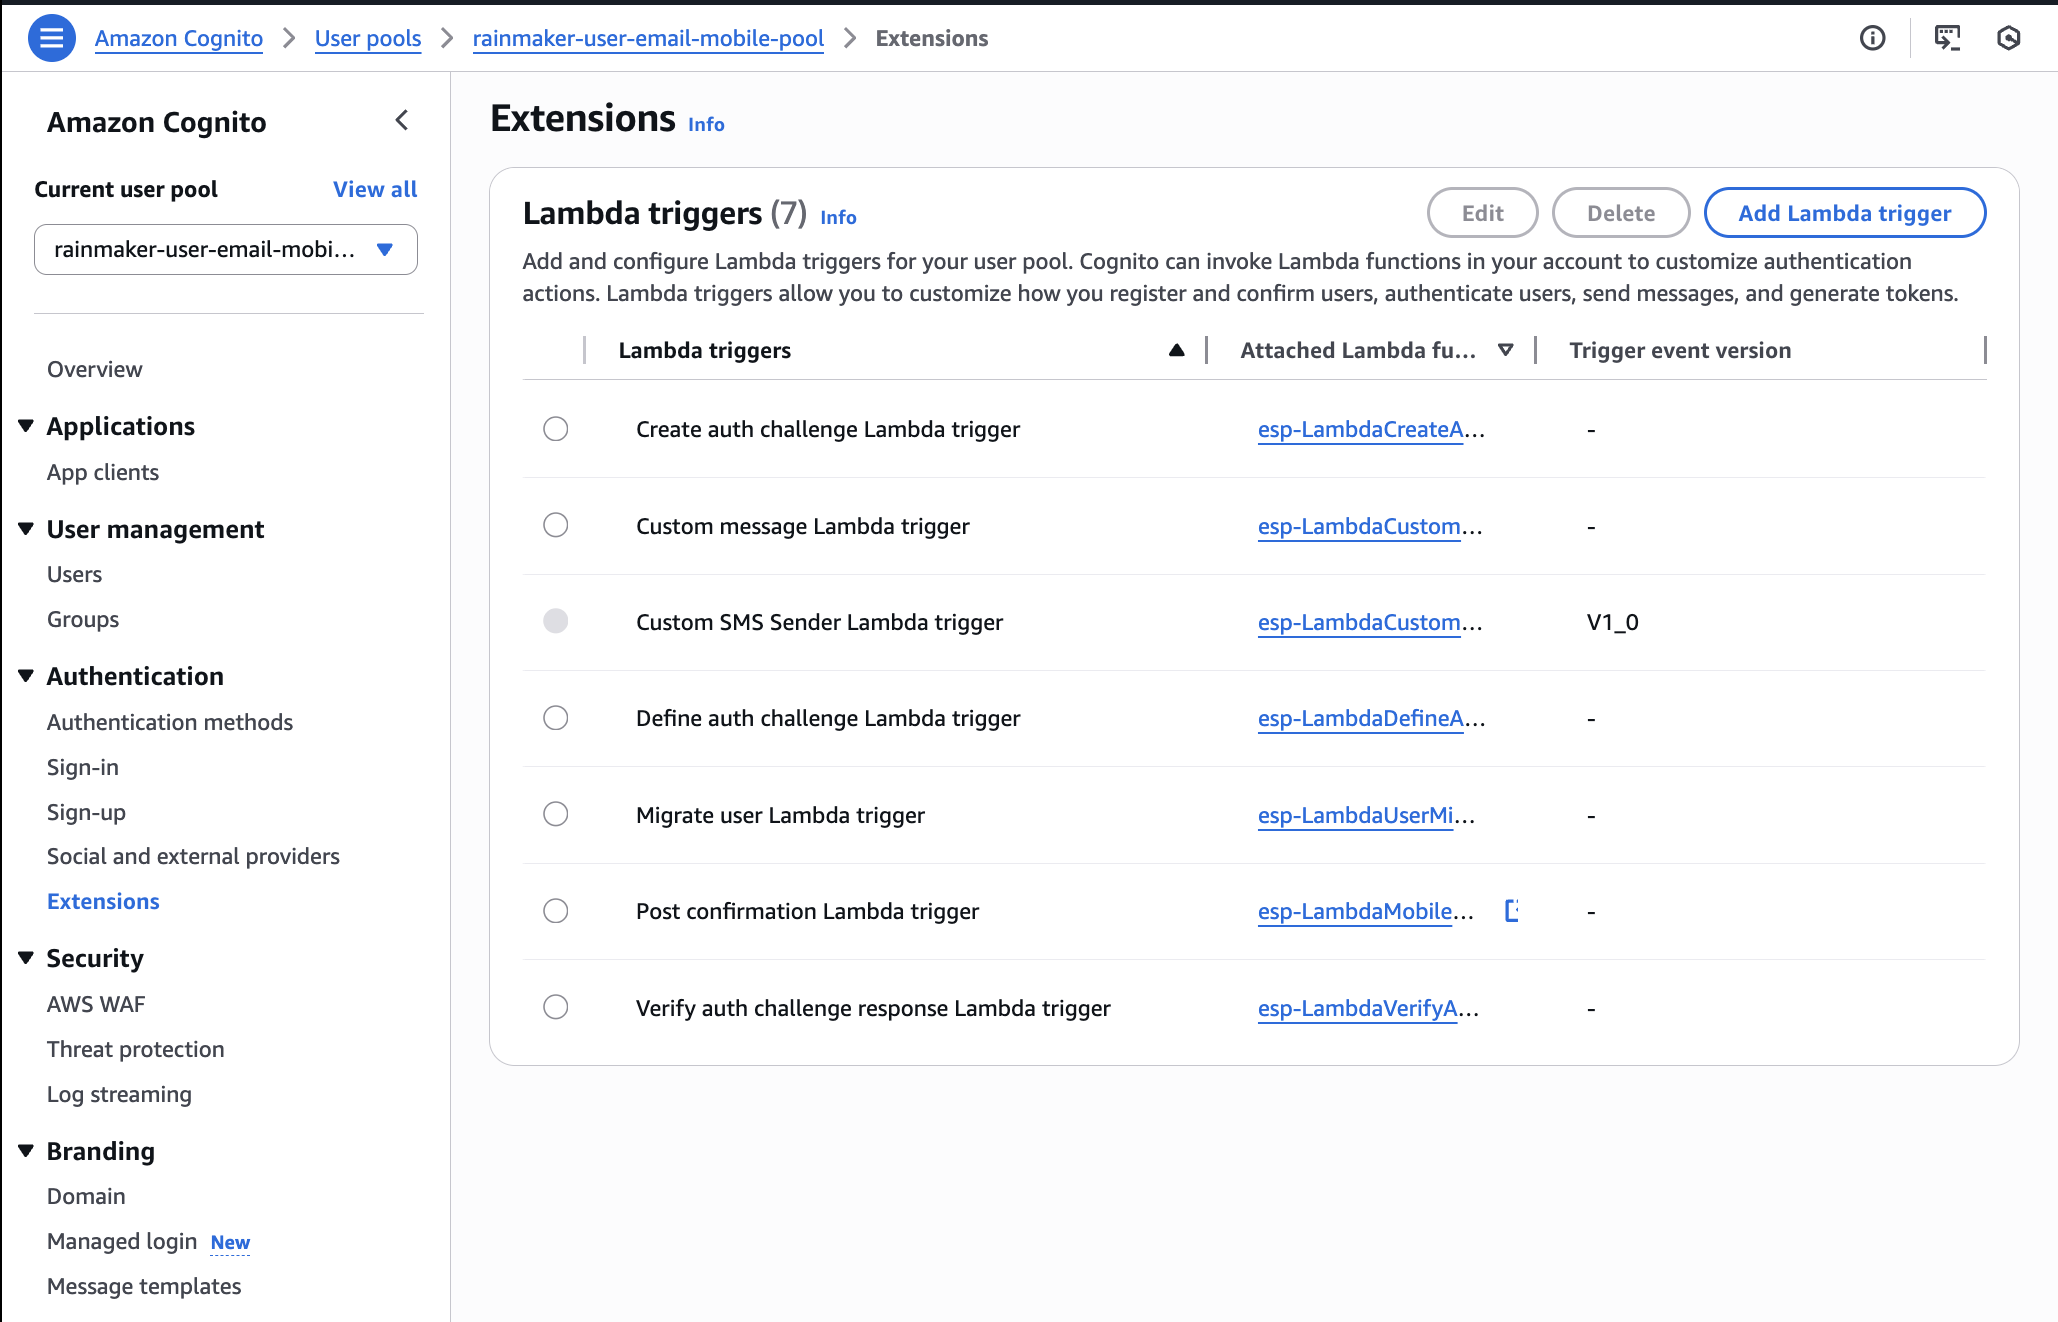
Navigate to
Extensionsin the left sidebar under theAuthenticationsection. -
If a
Pre token generationLambda trigger is enabled, select the lambda trigger and clickDelete. -
If there is no such trigger, skip further action.
2. Disable Threat Protection
-
Open the user pool in the AWS Console.
-
Click
Threat protectionin the left sidebar under theSecuritysection. -
If any threat protection features (such as
Advanced Security,Compromised Credentials Check, orAdaptive Authentication) are enabled, deactivate them. -
If all options show as disabled with an option to
Switch to Plus, skip further action.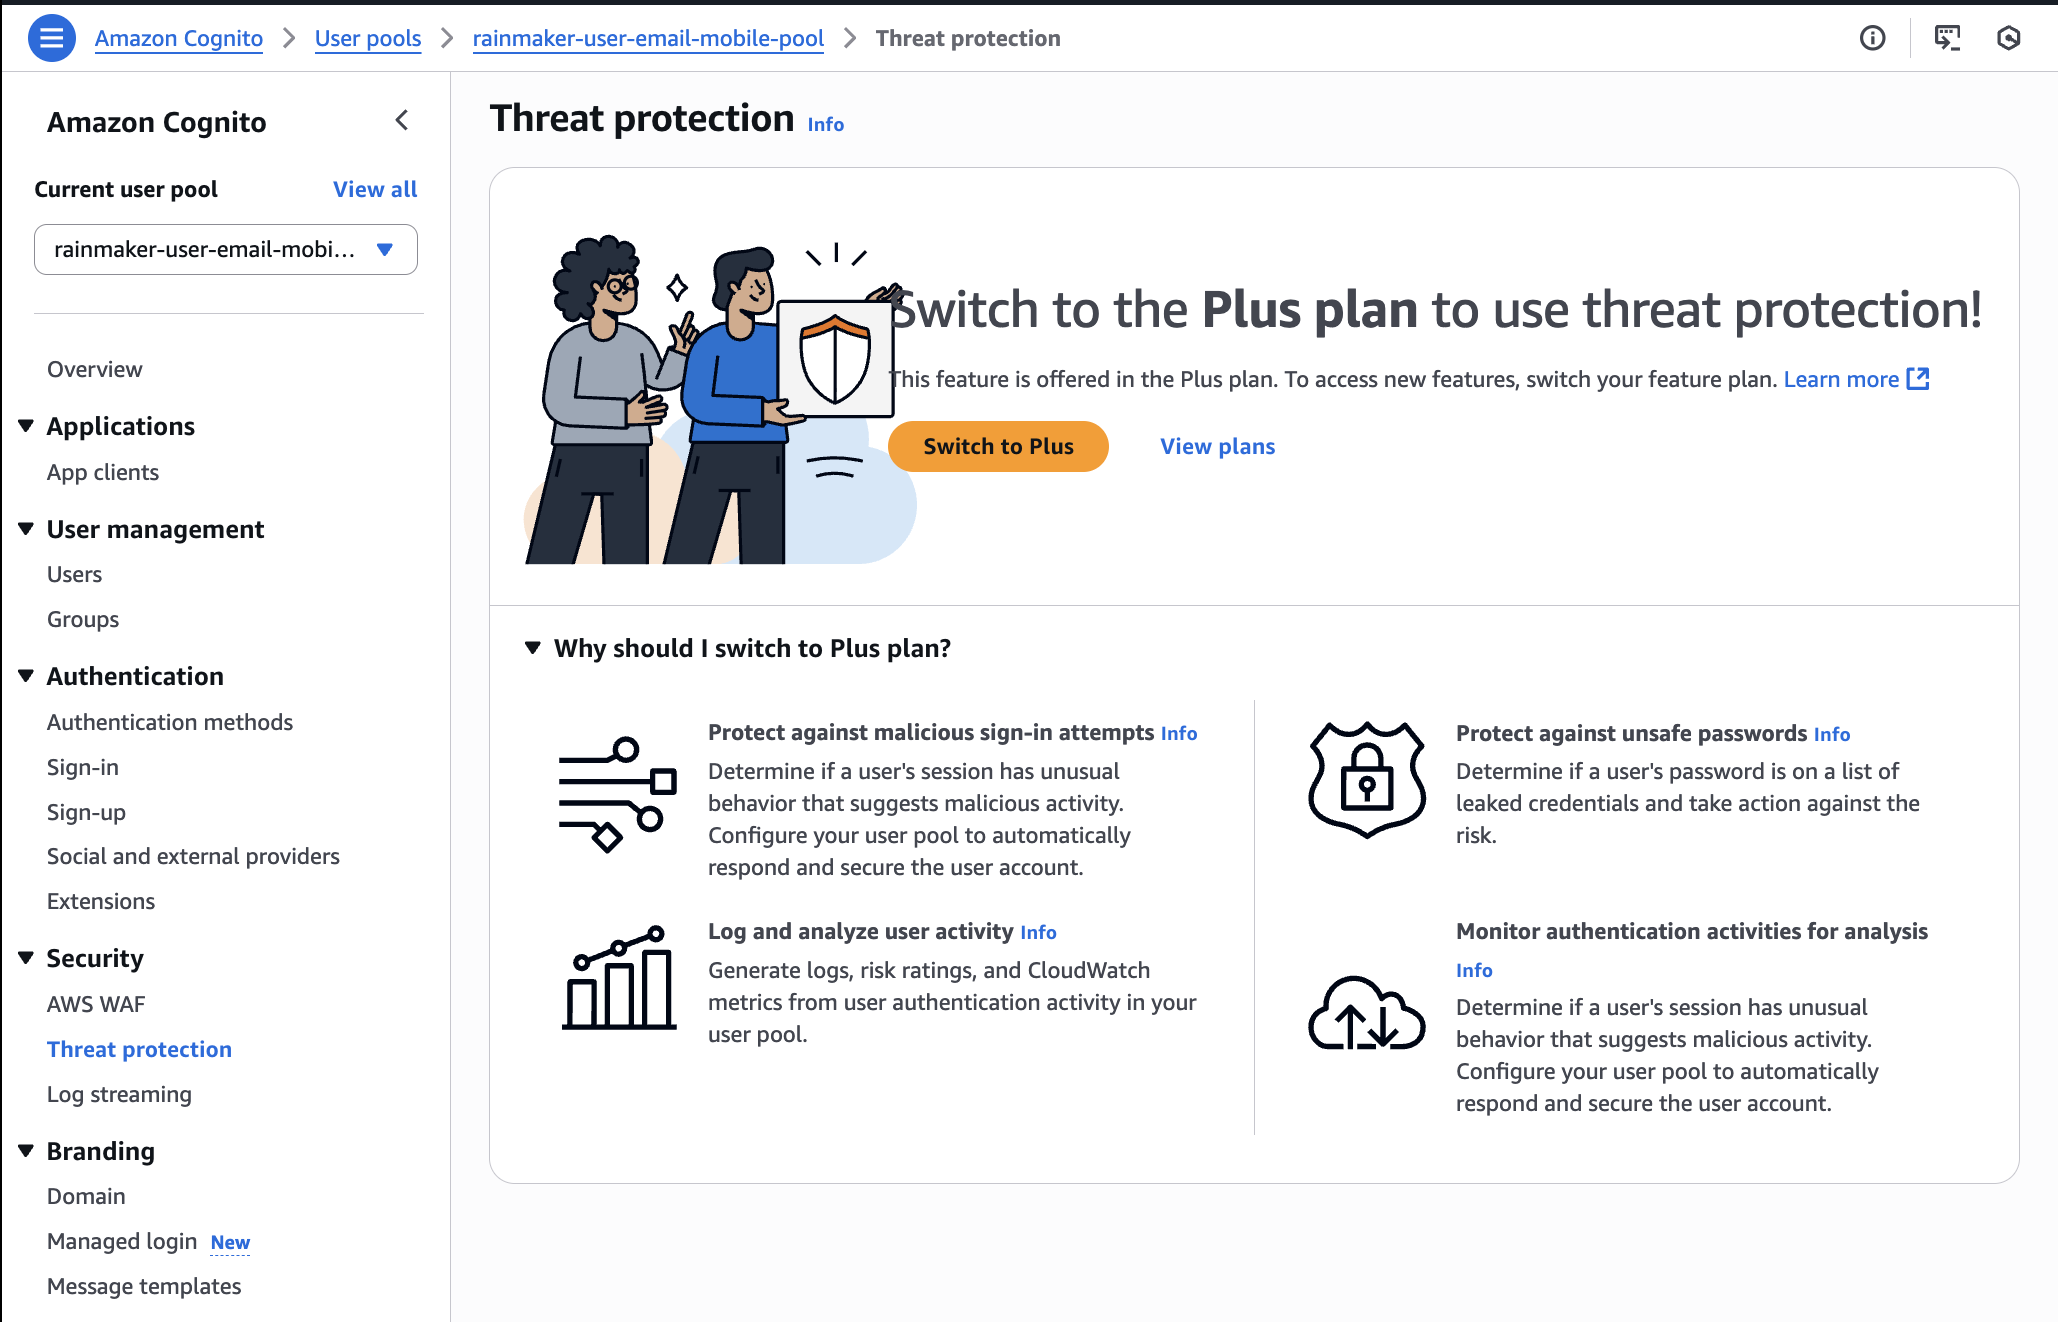
3. Turn Off Log Streaming (Log Export)
-
Open the user pool in the AWS Console.
-
Click
Log streamingin the left sidebar under theSecuritysection. -
If log delivery or streaming is configured to CloudWatch or other destinations, remove these destinations.
-
If all options show as disabled with an option to
Switch to Plus, skip further action.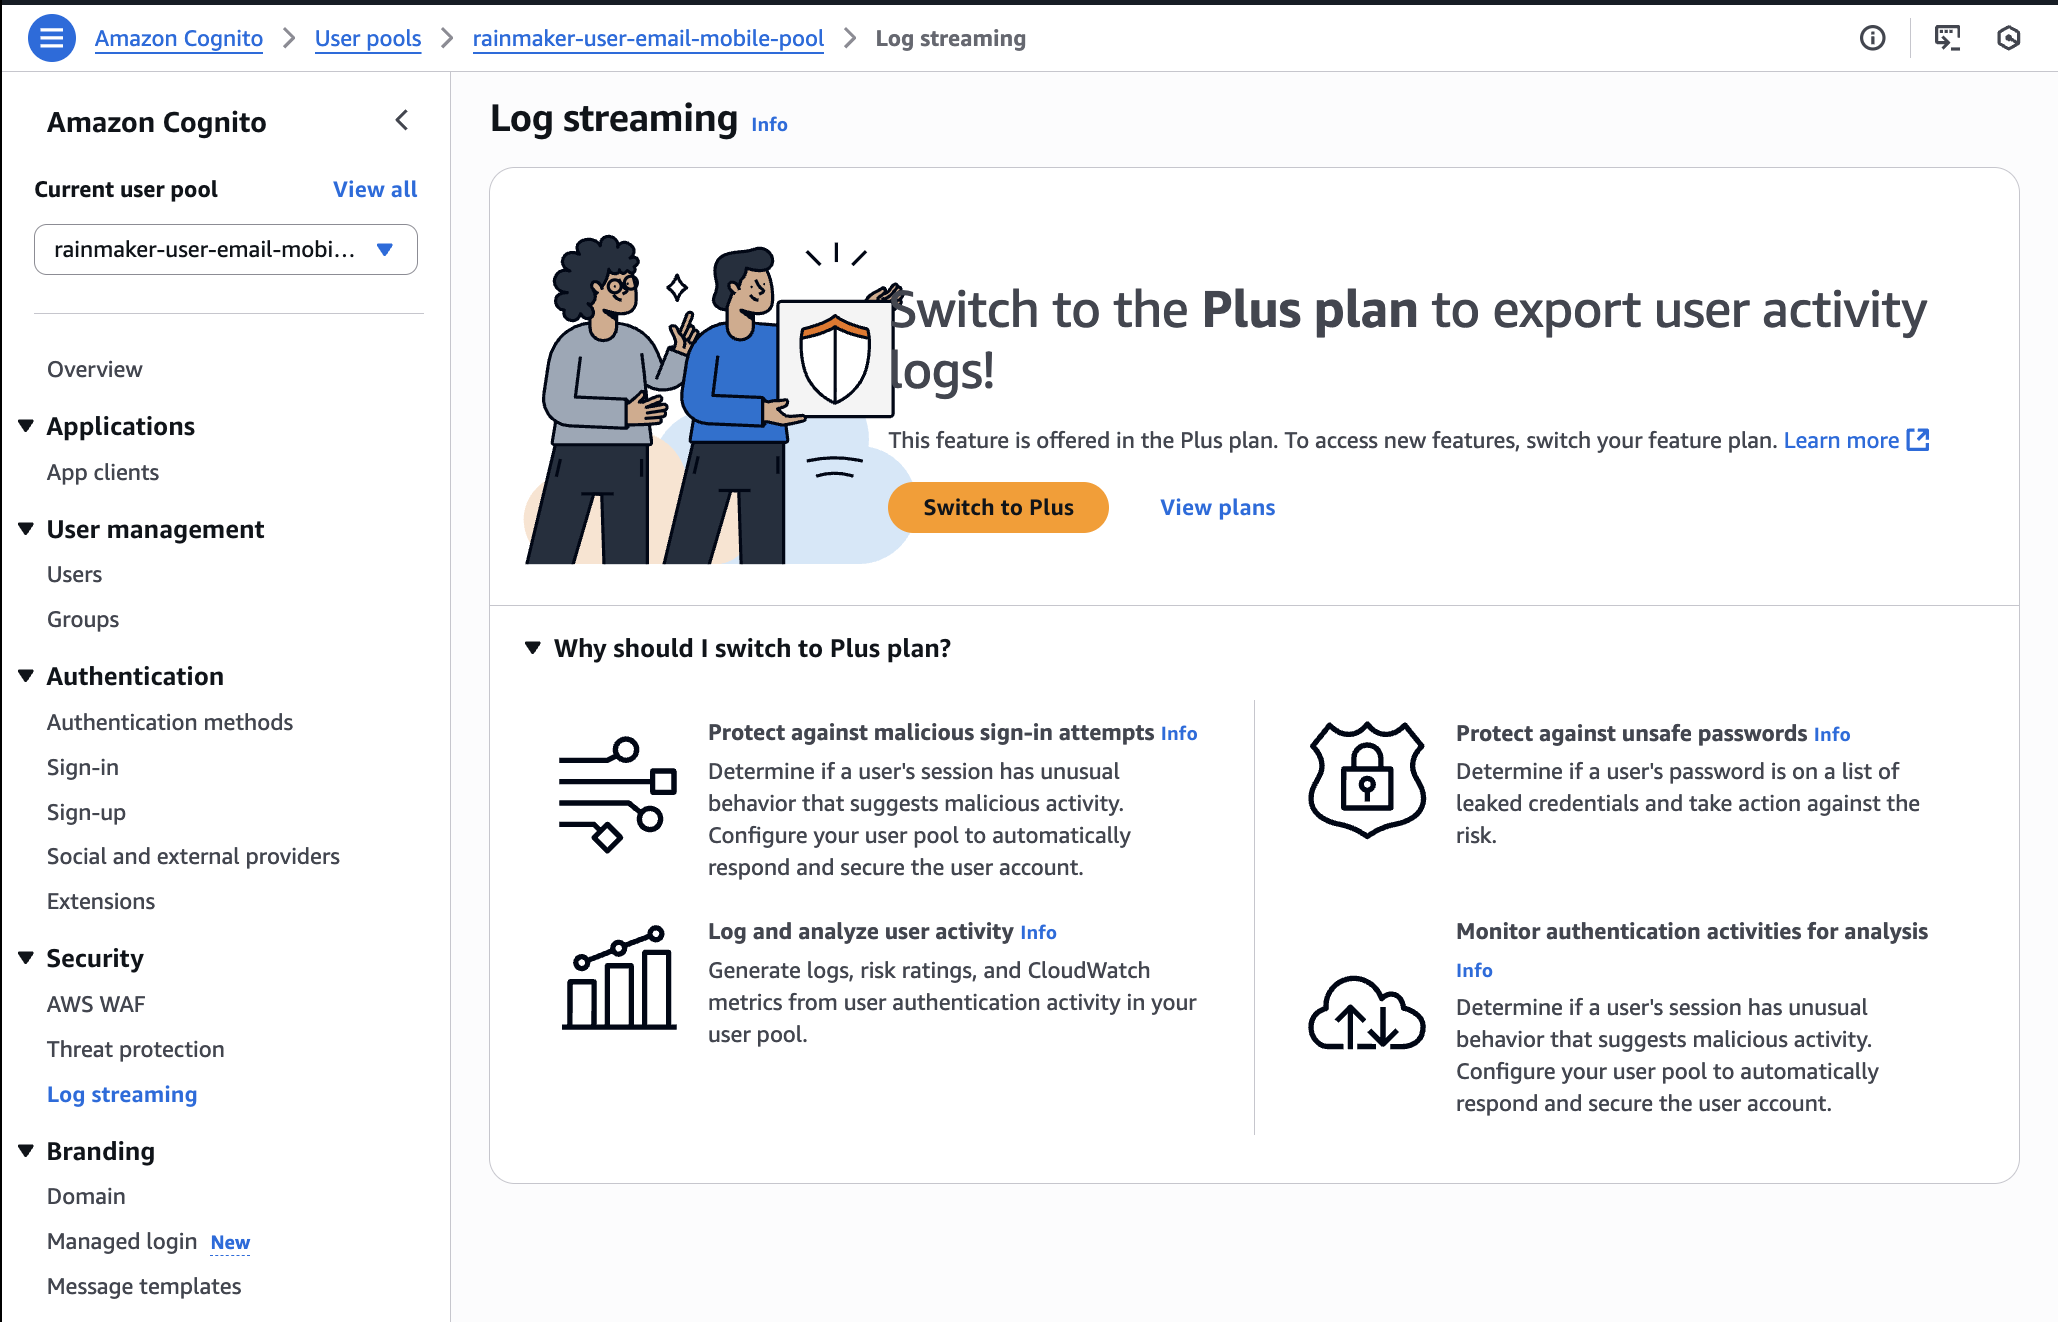
4. Disable Email-based MFA
-
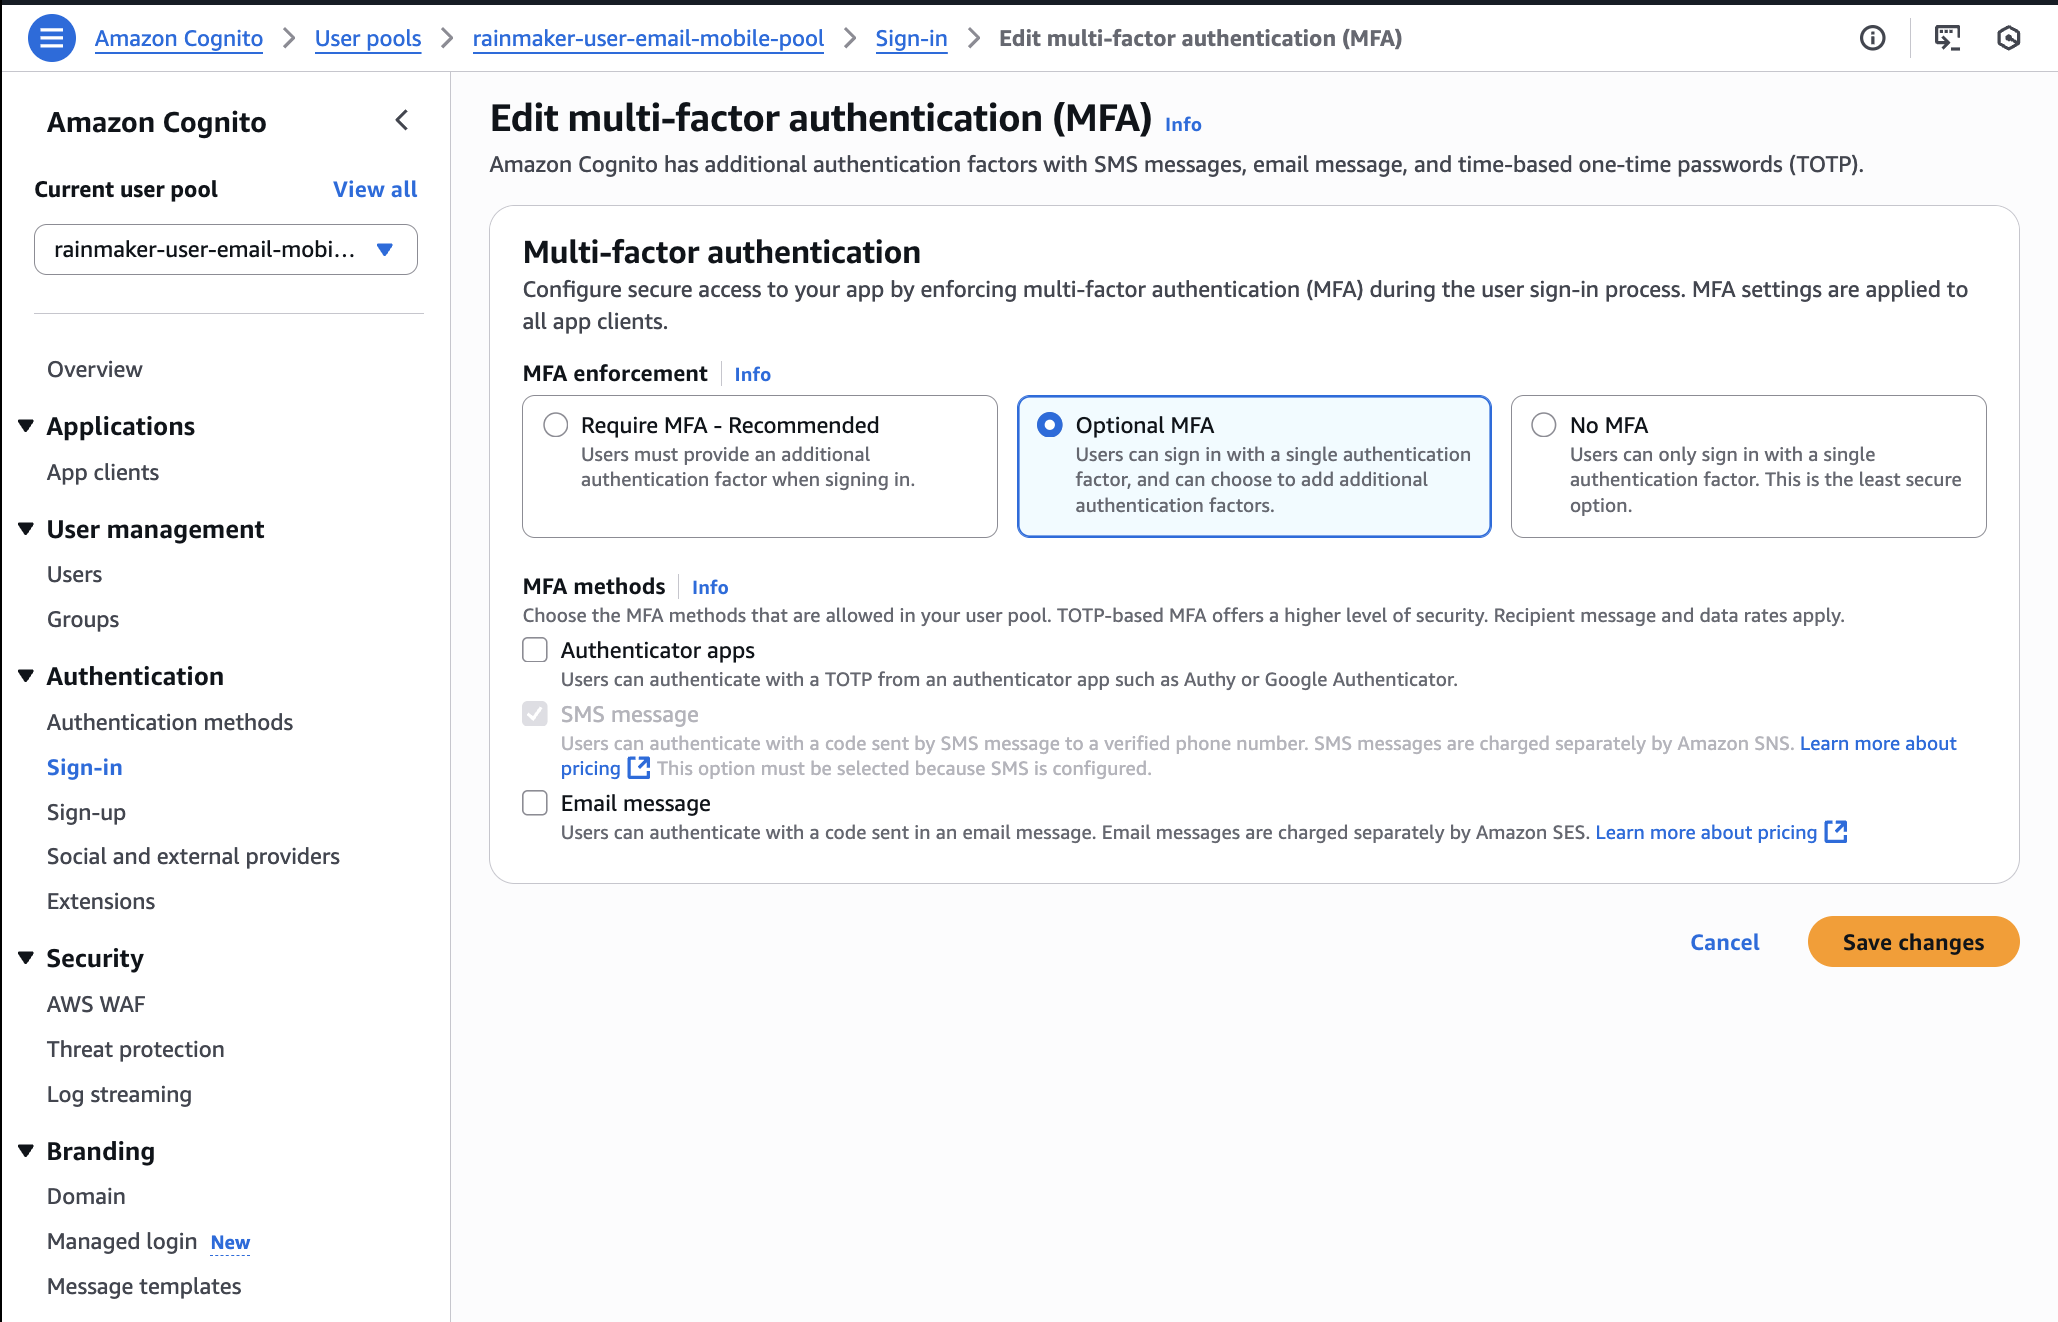
In the user pool Console, select
Sign-infrom the left sidebar under theAuthenticationsection. -
Click
EditforMulti-factor authentication. -
If
Email messageis selected asMFA methods, underRequire MFAorOptional MFA, deselect it. ClickSave changesto confirm. -
If "Email message" is not shown or currently selected, skip further action.
5. Remove Password Reuse Prevention
-
In the left sidebar, choose
Authentication methodsand thenPassword policy. -
Check the value for
Prevent use of previous passwords. -
If the value is greater than zero, edit and set it to
zero. -
Save changes to change the option to
Allow reuse of previous passwords. -
If an option already appears as
Allow reuse of previous passwords, skip further action.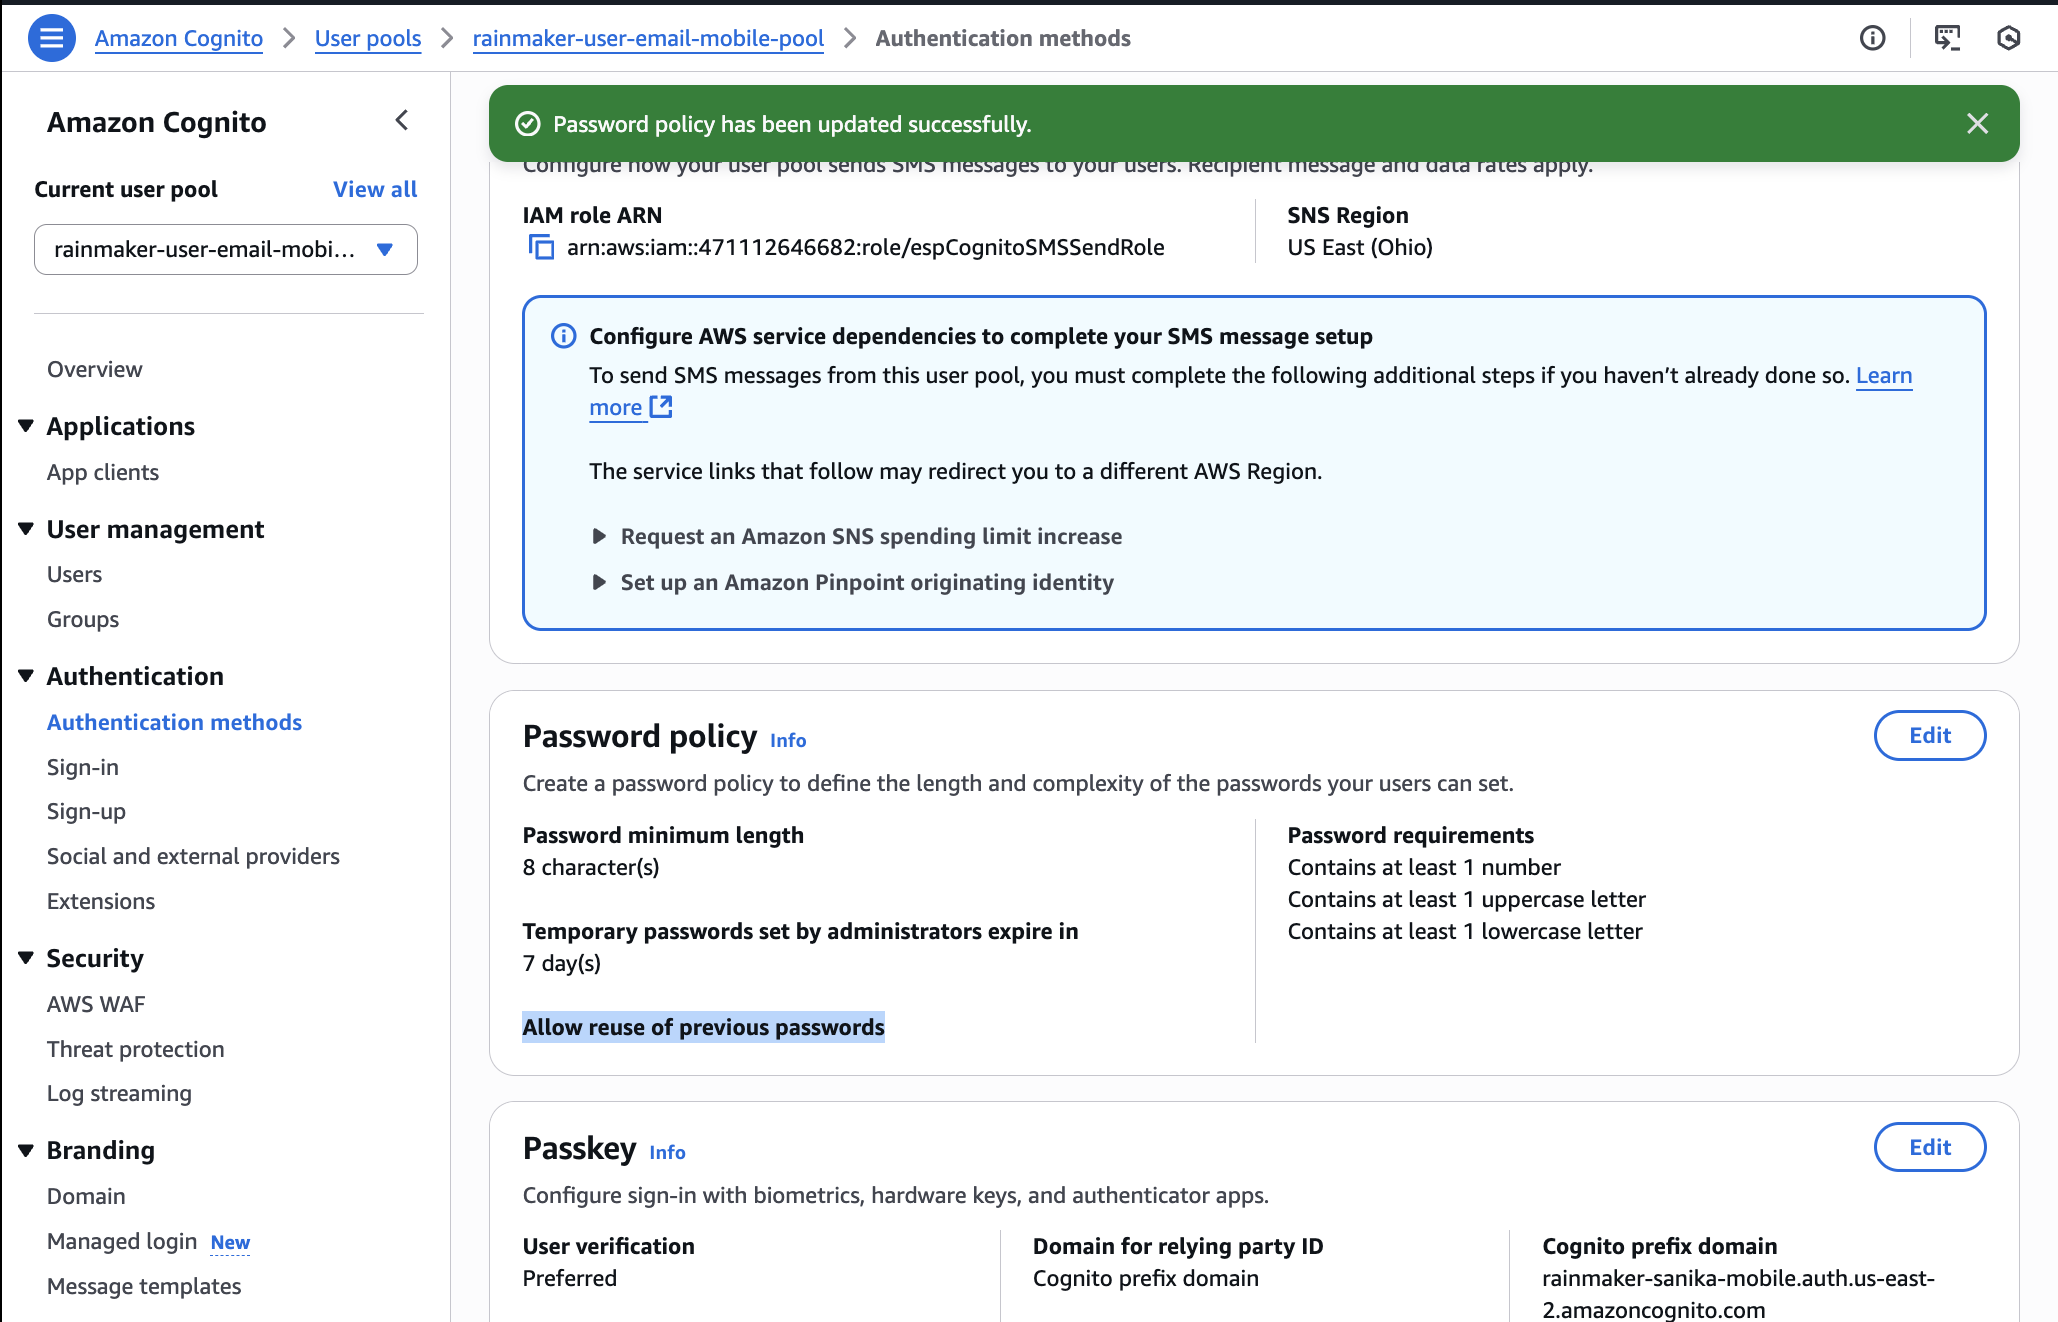
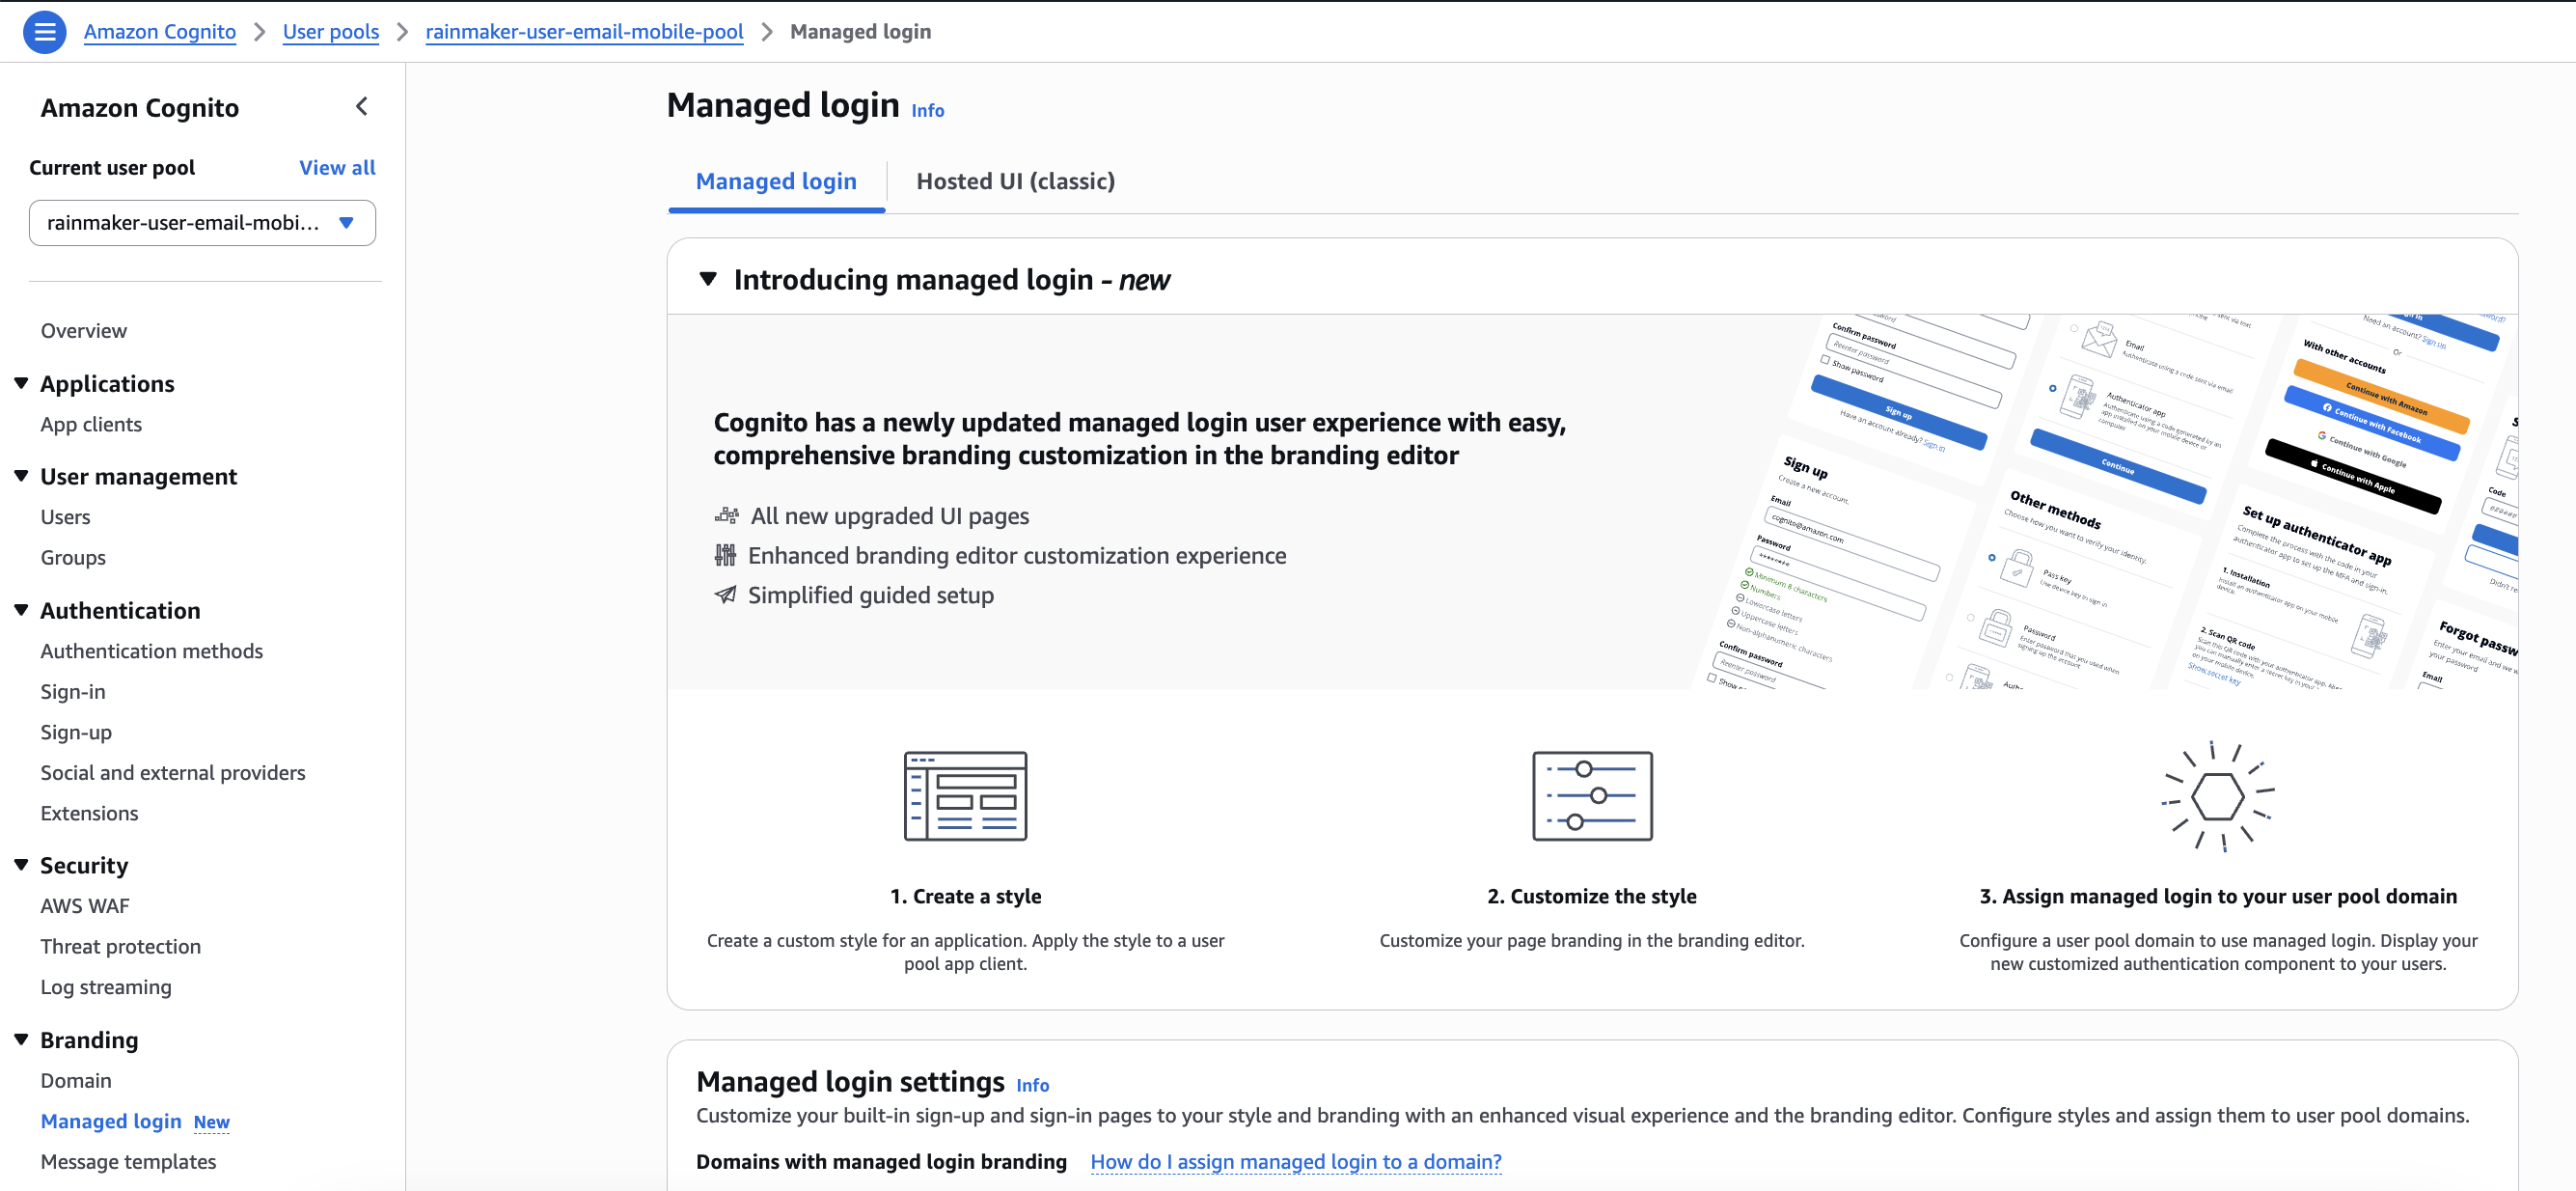
6. Revert Managed Login (Hosted UI)
-
In the left sidebar, click
Managed loginunder Branding section. -
If
Managed loginor advanced branding features are enabled or customized, revert to basic Hosted UI branding/settings or delete the customized managed login pages. -
If standard Hosted UI is already used, skip further action.
7. Disable Choice-Based Authentication
-
In the sidebar, select
Sign-inand thenOptions for choice-based sign-in. -
If
Passwordless statusisActive, click theEditoption. -
Unselect all three provided options:
PasskeyEmail message one-time passwordSMS message one-time password
-
Click
Save Changesto confirm. -
If only
Password based sign-inis active andPasswordless statusis inactive, skip further actions.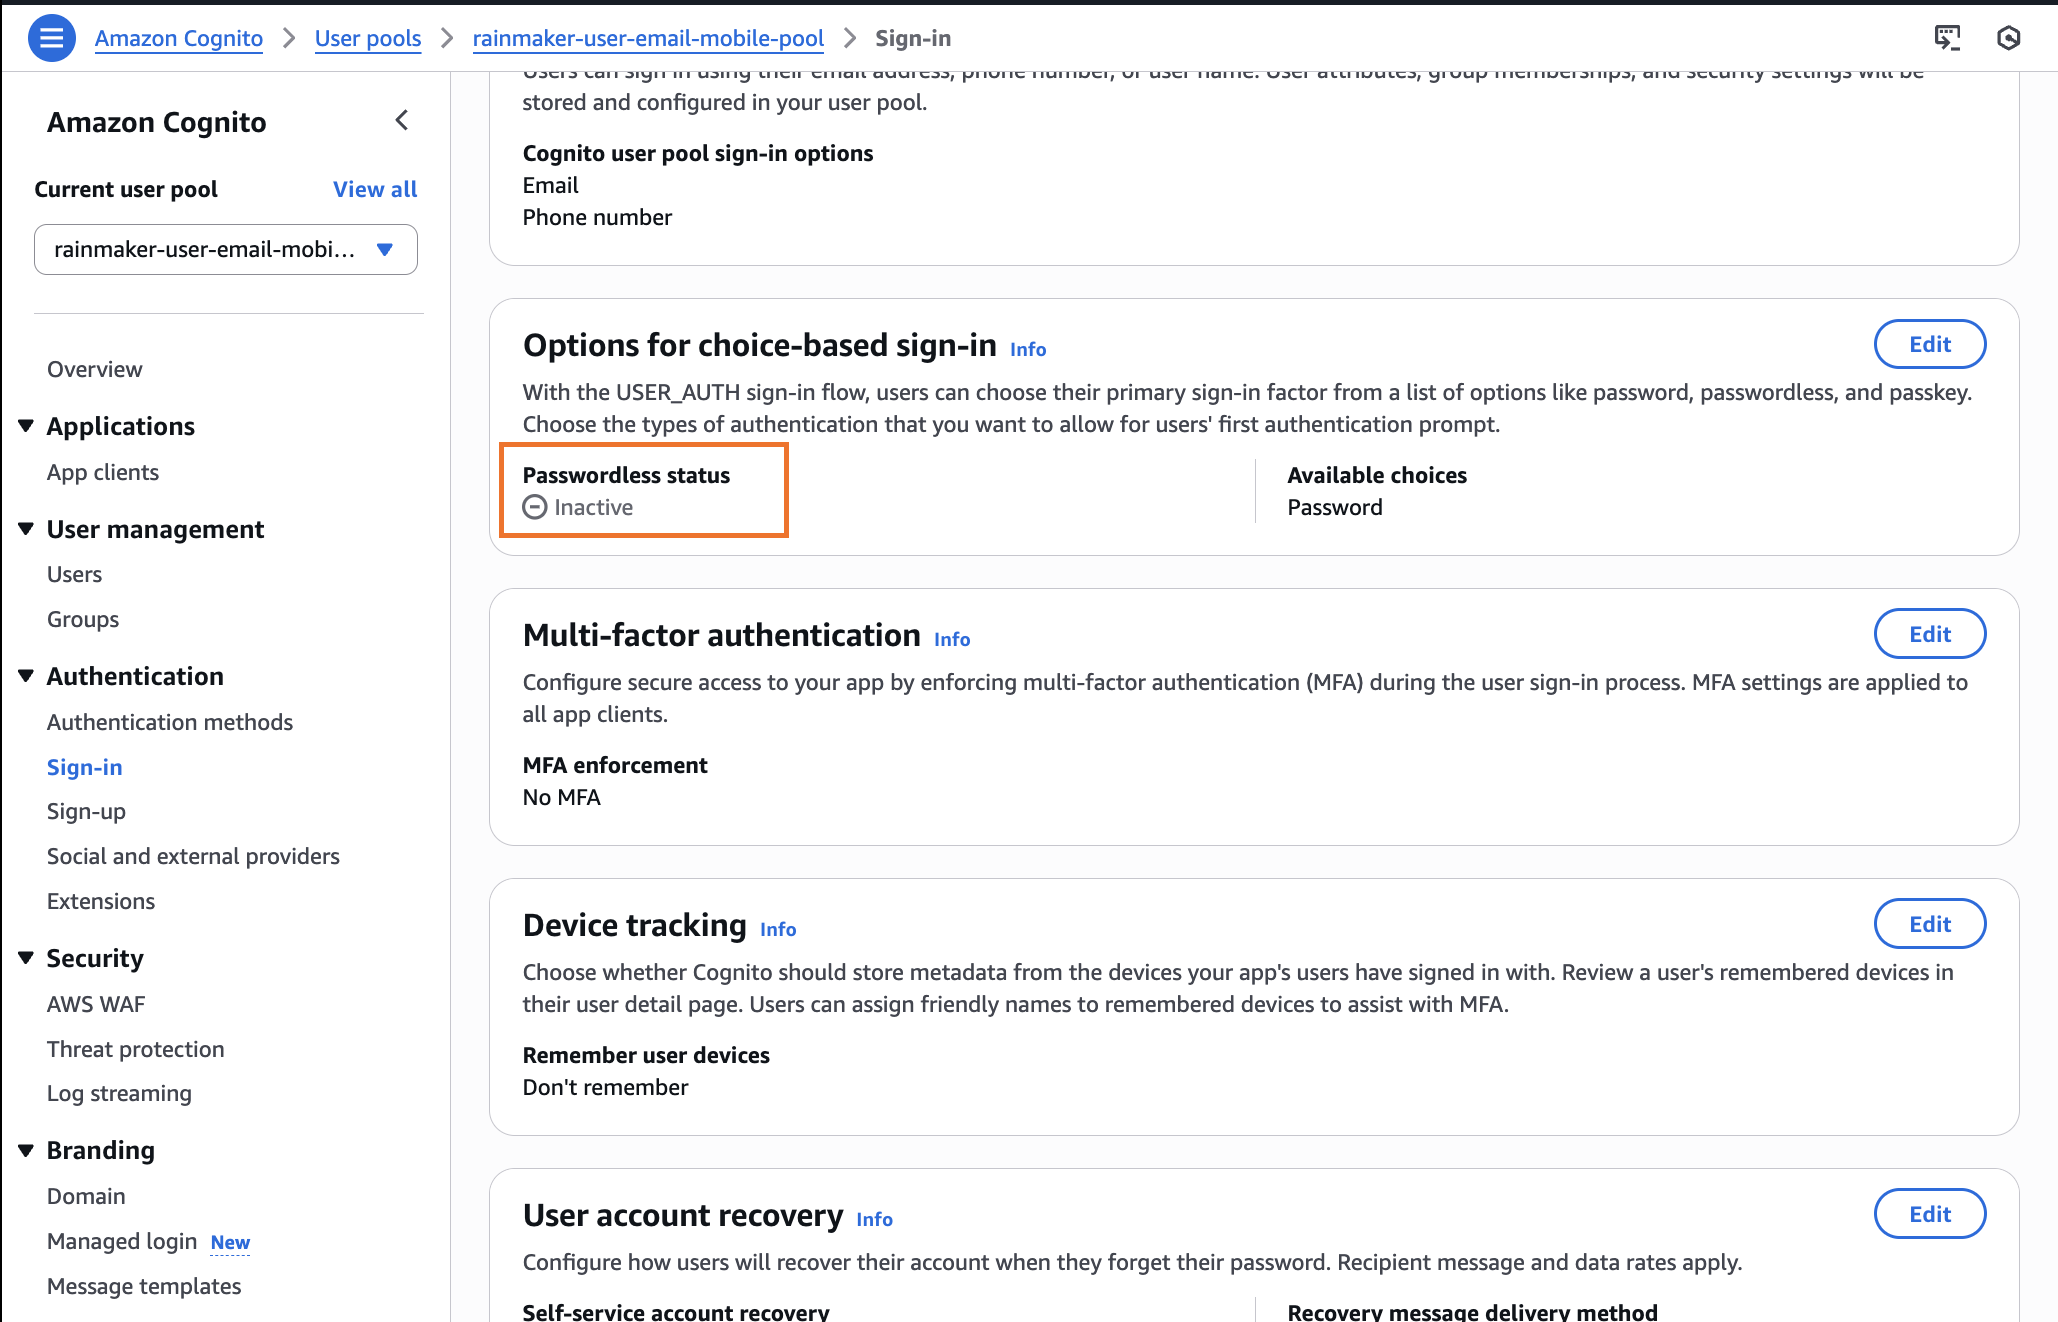
Additional Notes
- If any feature is found already absent or not configured, you may skip deactivation for that step.
- Always verify all features are disabled before using your API to downgrade the tier.
- Review the user pool configuration after making changes to ensure all advanced features have been successfully disabled.
- Once all advanced features are disabled, you can proceed with entering the verification code sent to your email to confirm the tier downgrade.
Please get in touch with the ESP RainMaker support team (esp-rainmaker-support@espressif.com) to deploy or set up China specified deployment requirement.
Configure the DNS Names
This feature is optional for Global RainMaker, but mandatory for China.
When the RainMaker backend and the frontend stacks are deployed successfully, you can access the API end points and the Dashboard using the URLs generated. Alternatively, you can configure to use the domain names which are specific to your organization, by configuring the Route 53 service.
Follow these steps to configure the Route 53 service:
- Create a hosted Zone in Route 53
- The first step is to create a hosted zone which will be associated with your domain registrar.
- The detailed steps for creating a hasted zone are in the below link:
- Map the hosted zone to the DNS registrar
- You might be using the services from some other service provider ( e.g. GoDaddy) for domain name mapping for your organization.
- In this case, you will need to map the hosted zone created in Route 53 to the DNS provider which your organization is currently using. The detailed steps for this configuration are as mentioned in the link below:
- If you are using GoDaddy as your DNS provider you can refer to the below link:
-
Map the API Gateway endpoint with the DNS name
- Once the mapping between the hosted zone and your current DNS provider is done, you will need to configure the API Gateway endpoint to Route 53 hosted zone.
tipFollow Get Base Url steps to fetch the API Gateway endpoint.
- The details about mapping the API Gateway endpoint with the DNS name are in the link below:
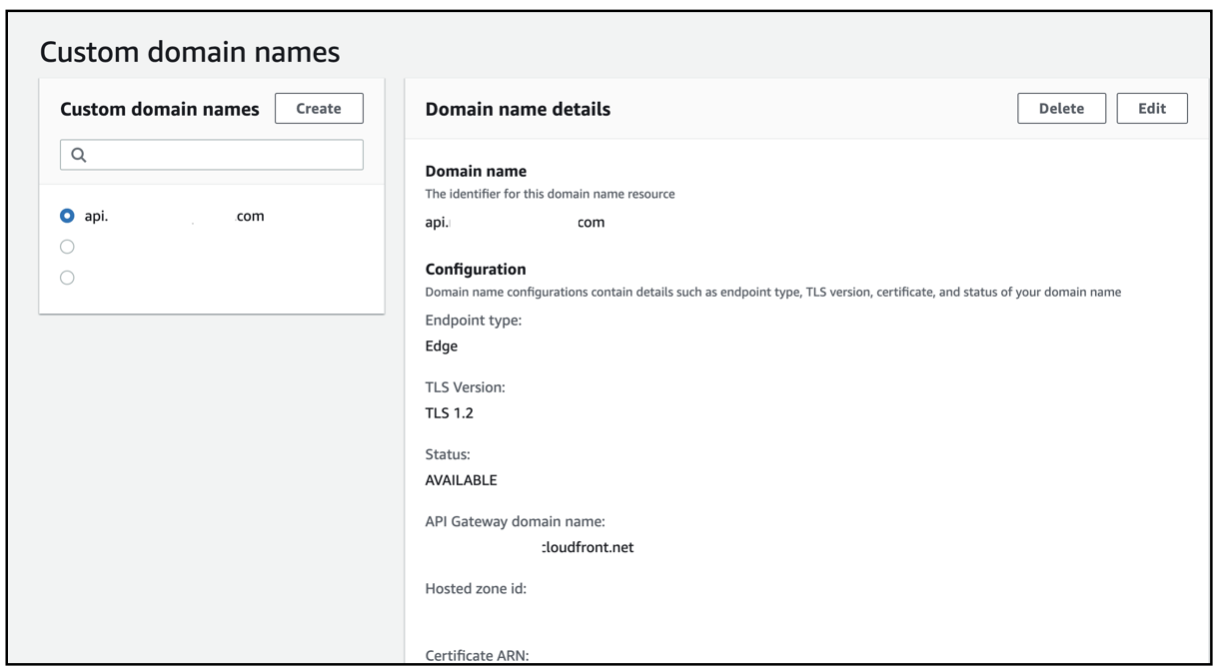
Take notePlease note, choose the API endpoint type as
Edge.After the configuration is done, the API Gateway and Custom domain names configuration will be as shown:
The Route 53 configuration for API Gateway will be as shown:
-
Configure the Domain name mapping for the RainMaker dashboard
-
When the RainMaker frontend stack is deployed, the required UI components are deployed and a CloudFront distribution is created.
-
This sets up the Content Delivery Network for caching the UI and provides SSL connectivity for the UI dashboard.
-
You can create your organization specific domain name for this, so that the admin users will be able to access the Dashboard using the domain name.
-
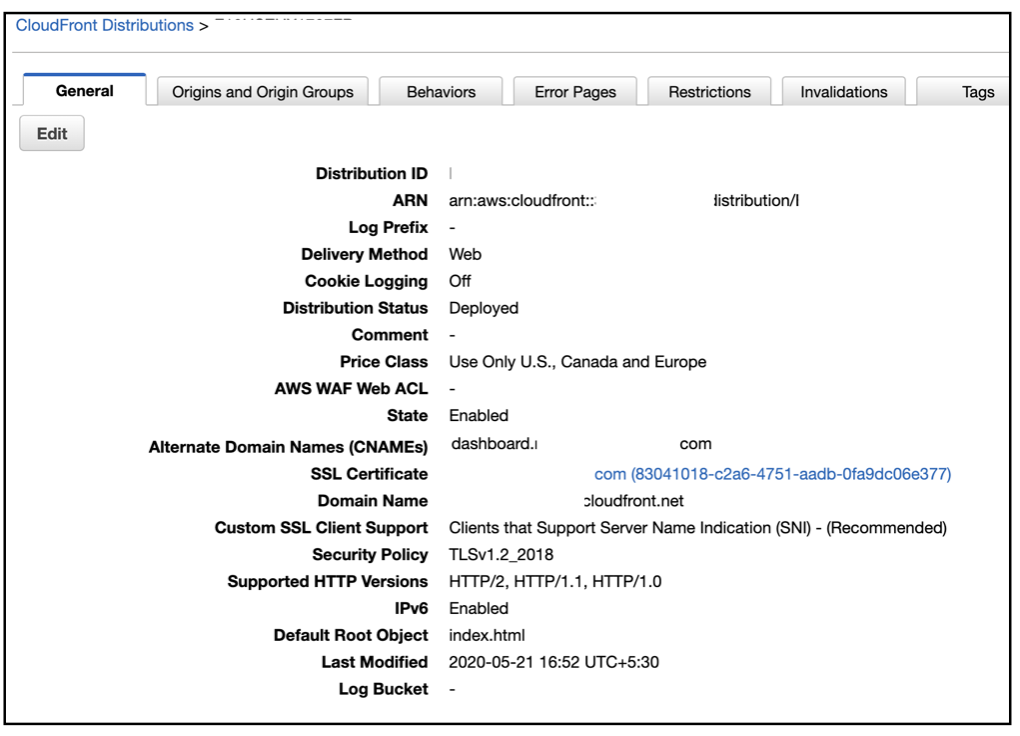
To check your CloudFront distribution, search for the
CloudFrontservice from the AWS console.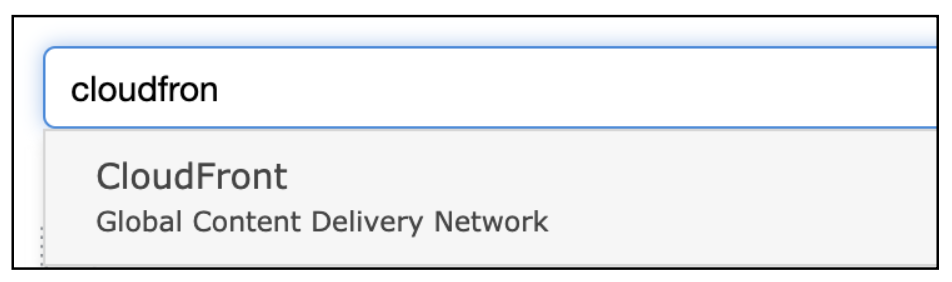
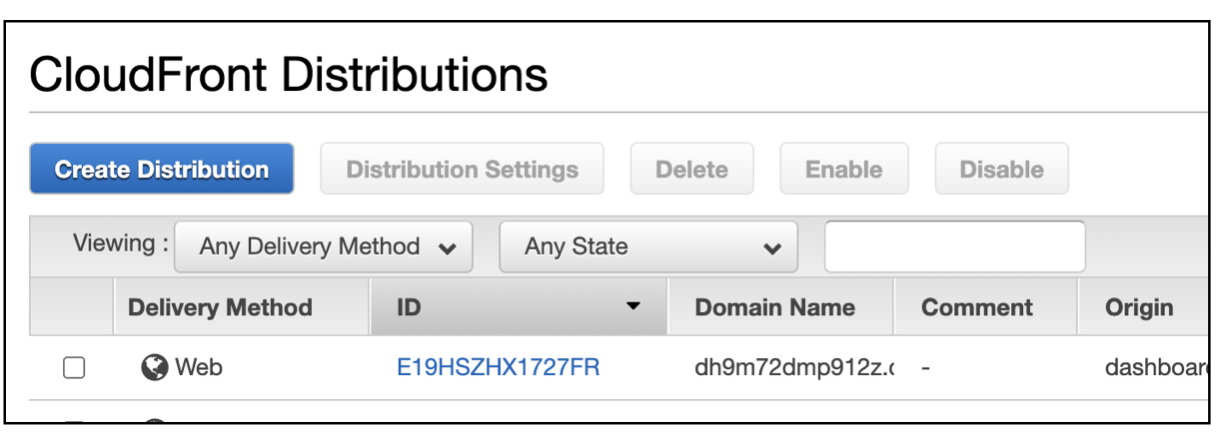
-
The steps to configure Route 53 DNS mapping for CloudFront distribution are as shown in the link below:
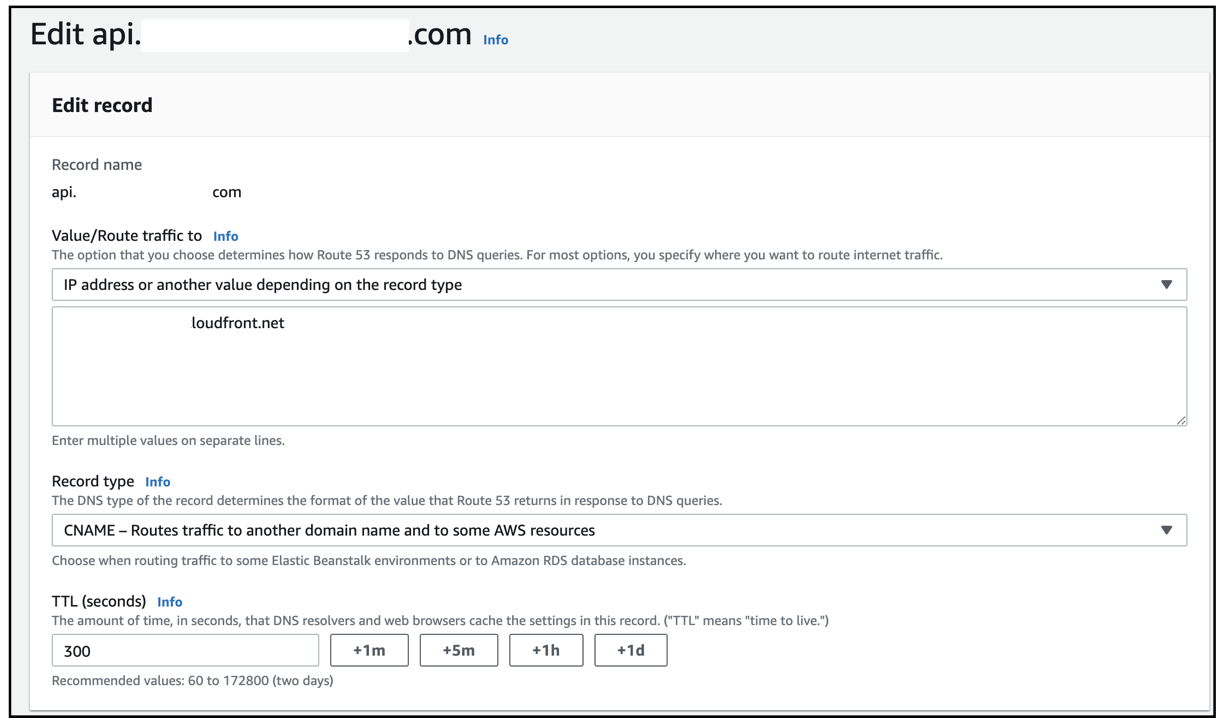
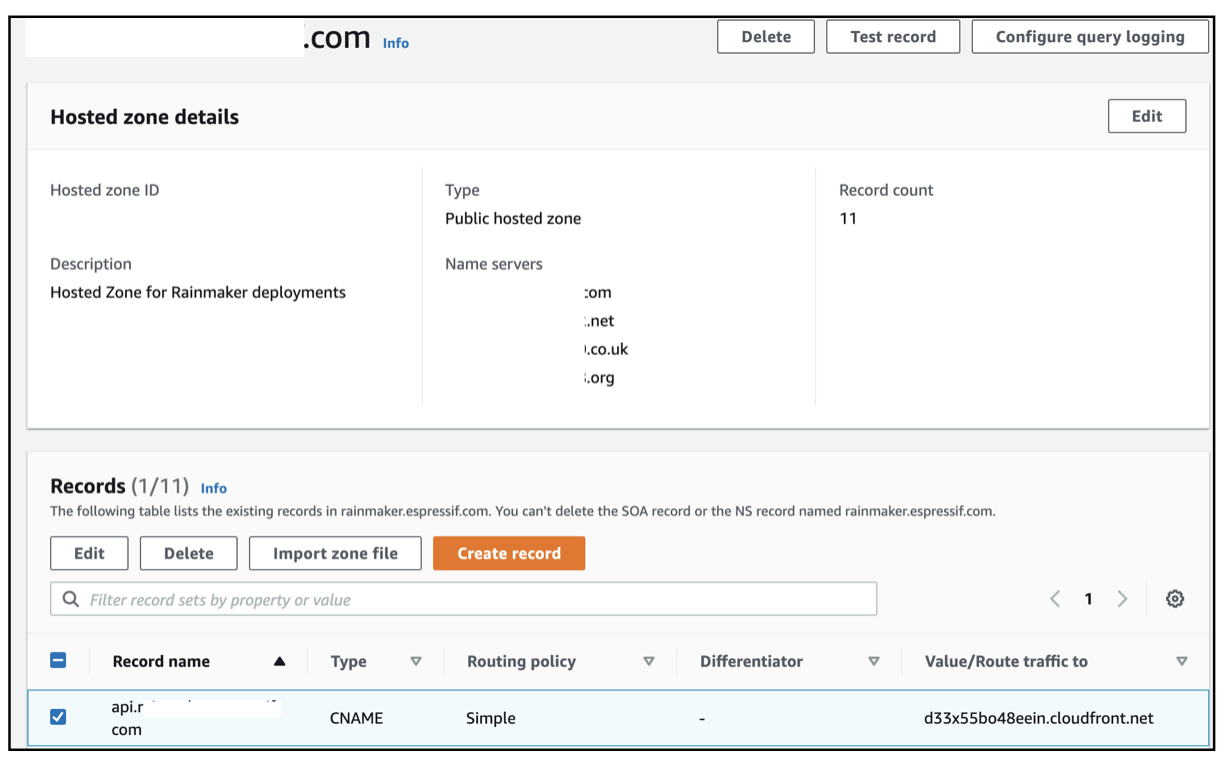
After the CloudFront distribution is configured with the DNS mapping, the CloudFront screen will be as shown:
The following is the Route 53 screen you'll see when setting up a CloudFront distribution:
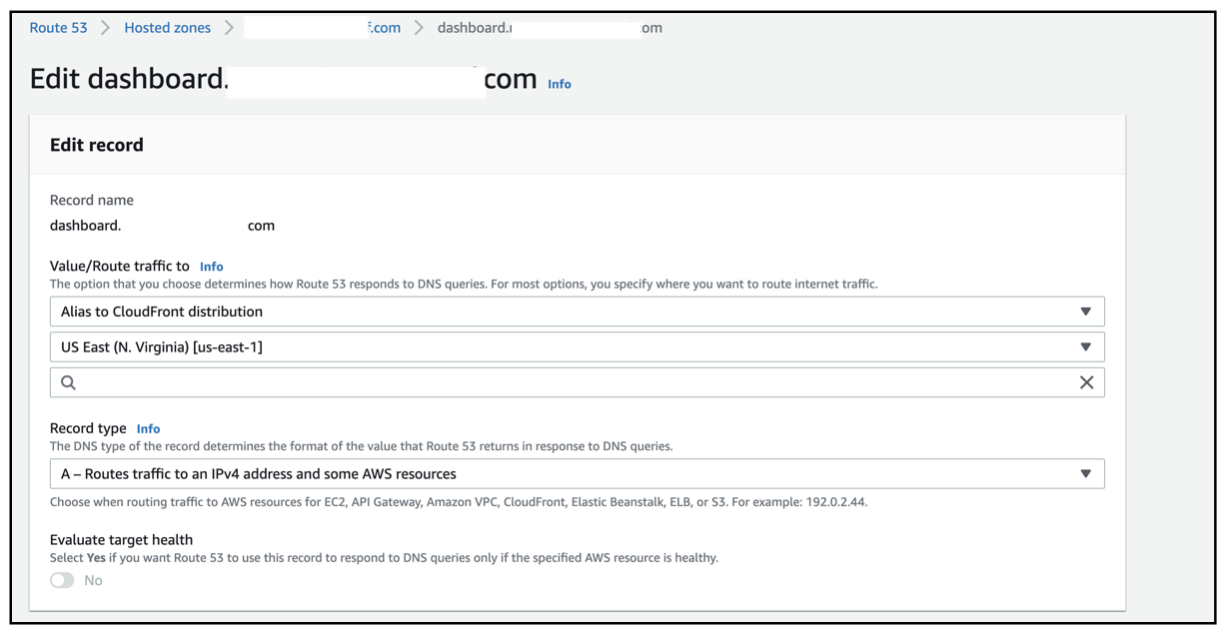
-